Remember where.
Find it fast.
KlikStuff is a local-first inventory for the things in your home, storage room, warehouse or workshop. Photograph an item, name it, and point to where it lives. Later, one search answers the only question that matters: where did I put it?
What KlikStuff does
Most people do not lose things. They forget which box, shelf or room they put them in. KlikStuff keeps that answer on your phone, with a photo to prove it.
- Save items with photos, notes, tags, serial numbers, prices and warranty dates.
- Build the location map you actually have: home → room → shelf → box → item.
- Search by name, tag, brand, serial number or the place it is stored.
- Record a GPS point when you are outdoors, and keep the indoor location as the source of truth.
- Print a QR label for a box, then scan it to jump straight to the contents.
- Track loans, consumables, moving plans, collections, insurance reports and clutter.
About the screenshots. They come from the real app running with fictional sample data — a made-up household called Cemara House. Your own items, names and photos never leave your device, and nothing in the sample data is real.
Getting started
The first launch takes under a minute. You can skip it and change everything later.
- Install KlikStuff from your app store, then open it.
- On the welcome screen, pick the interface language. KlikStuff starts in Indonesian when your region is Indonesia and in English everywhere else.
- Tap Get started, optionally pick what you save most often, then tap Continue.
- On the last page, tap Start using KlikStuff. The home screen opens with an empty inventory.
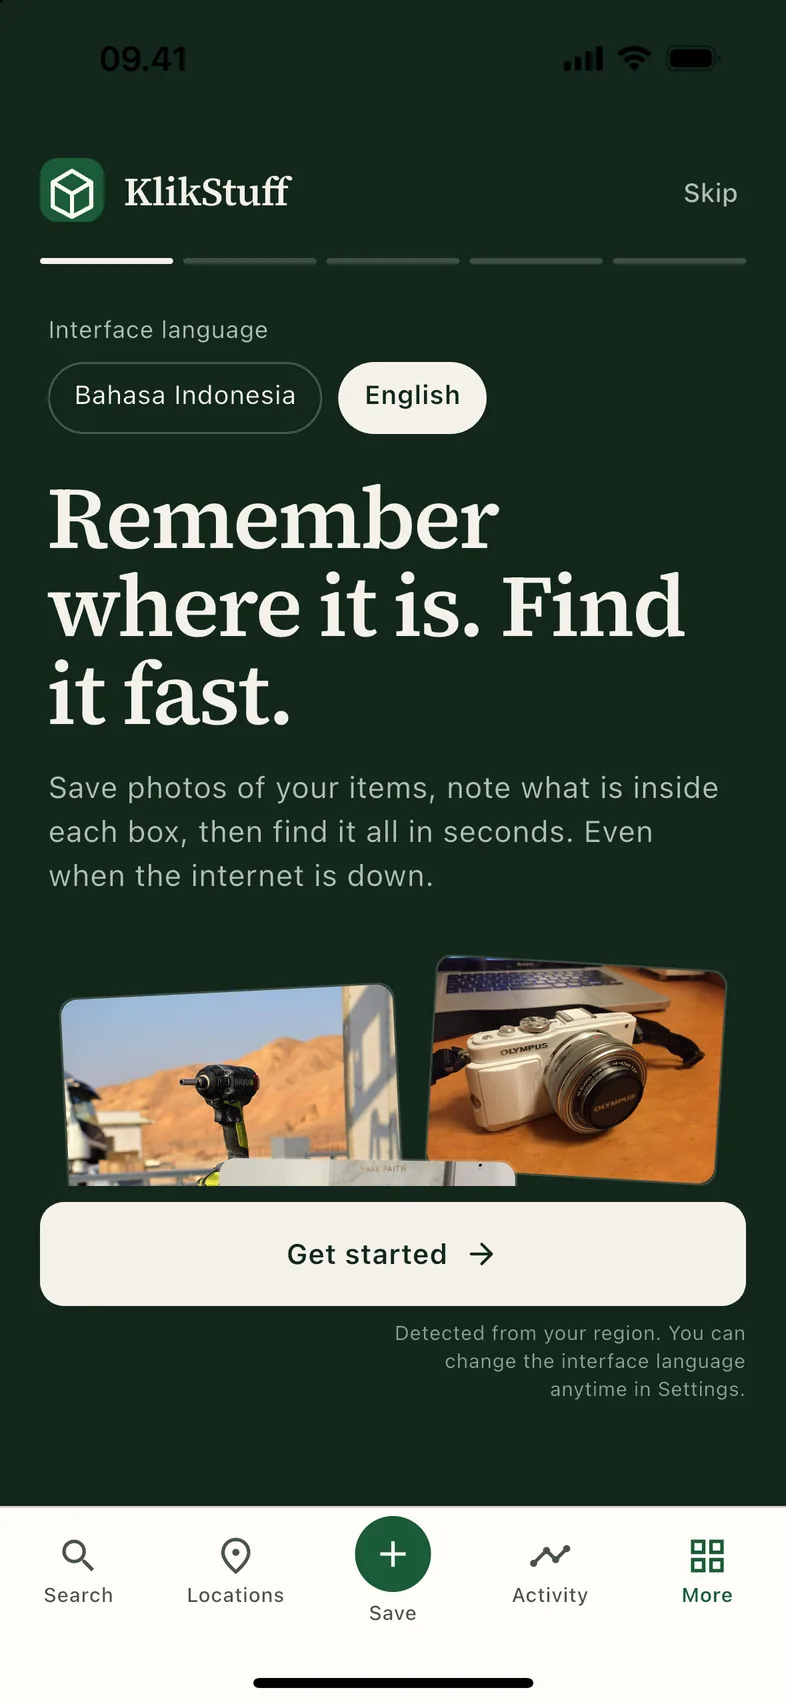
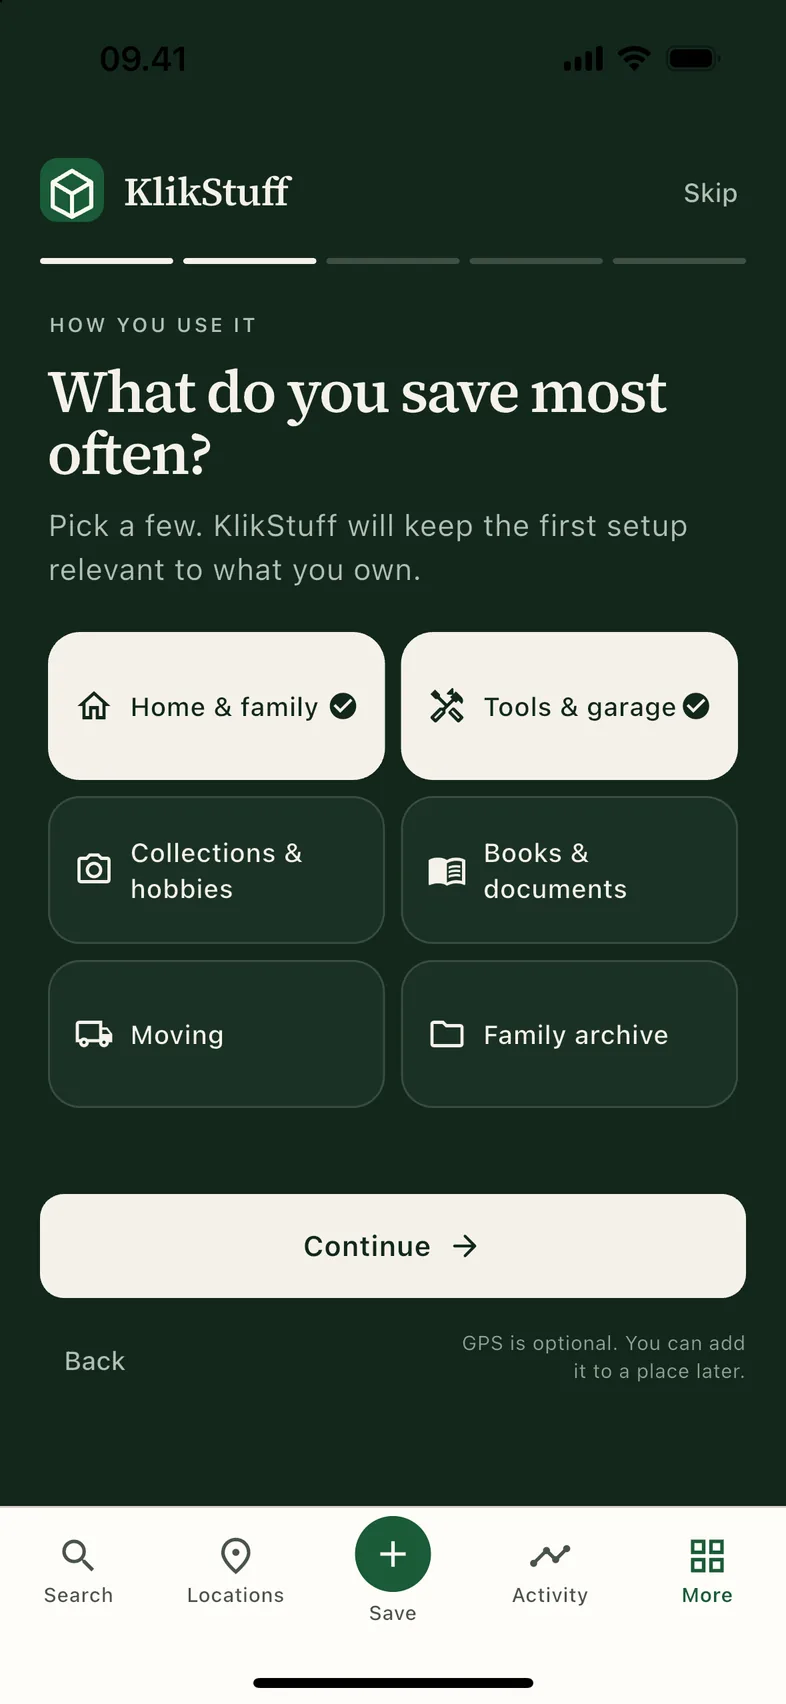
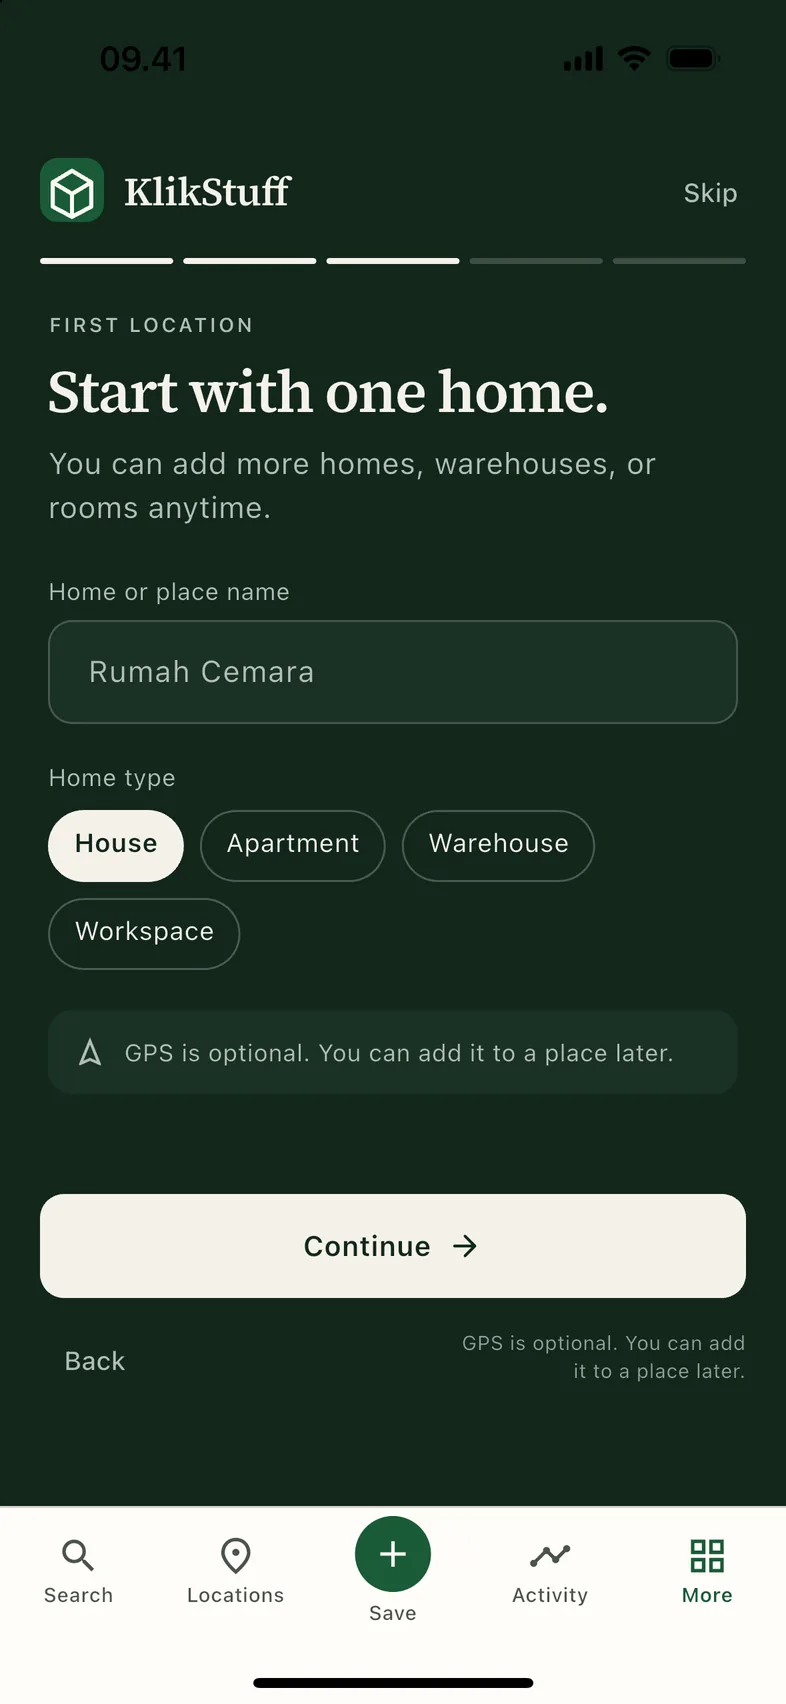
Tip: you do not need a home or a location to start. Tap Save and add the first item — you can create a place for it inside the item form, or add one later.
The home screen
Home is the search tab. Everything else is one tap away in the bottom bar.
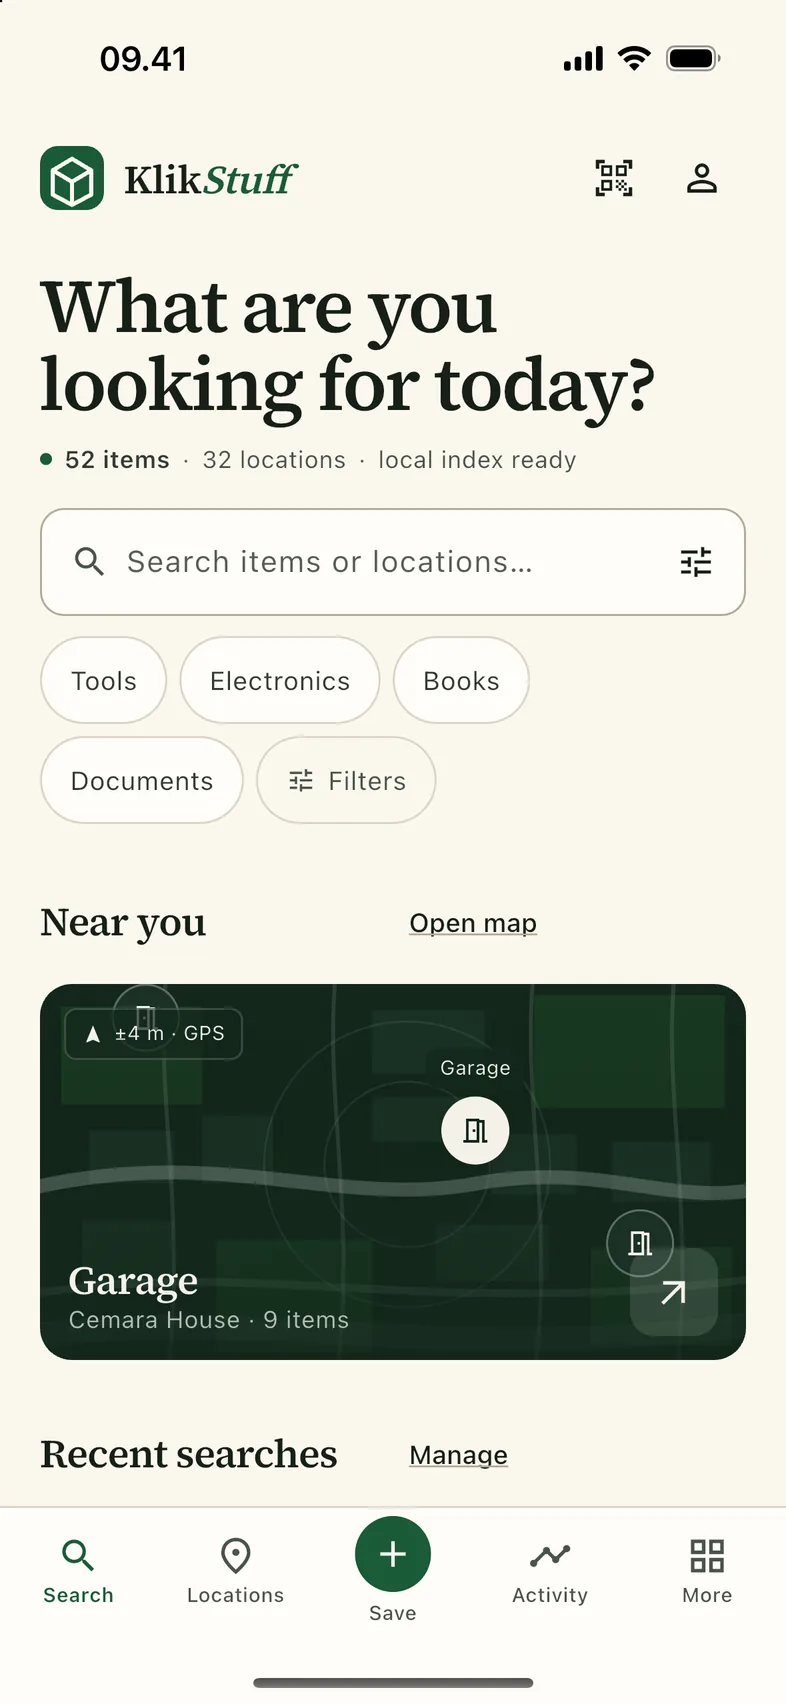
| Area | What it is for |
|---|---|
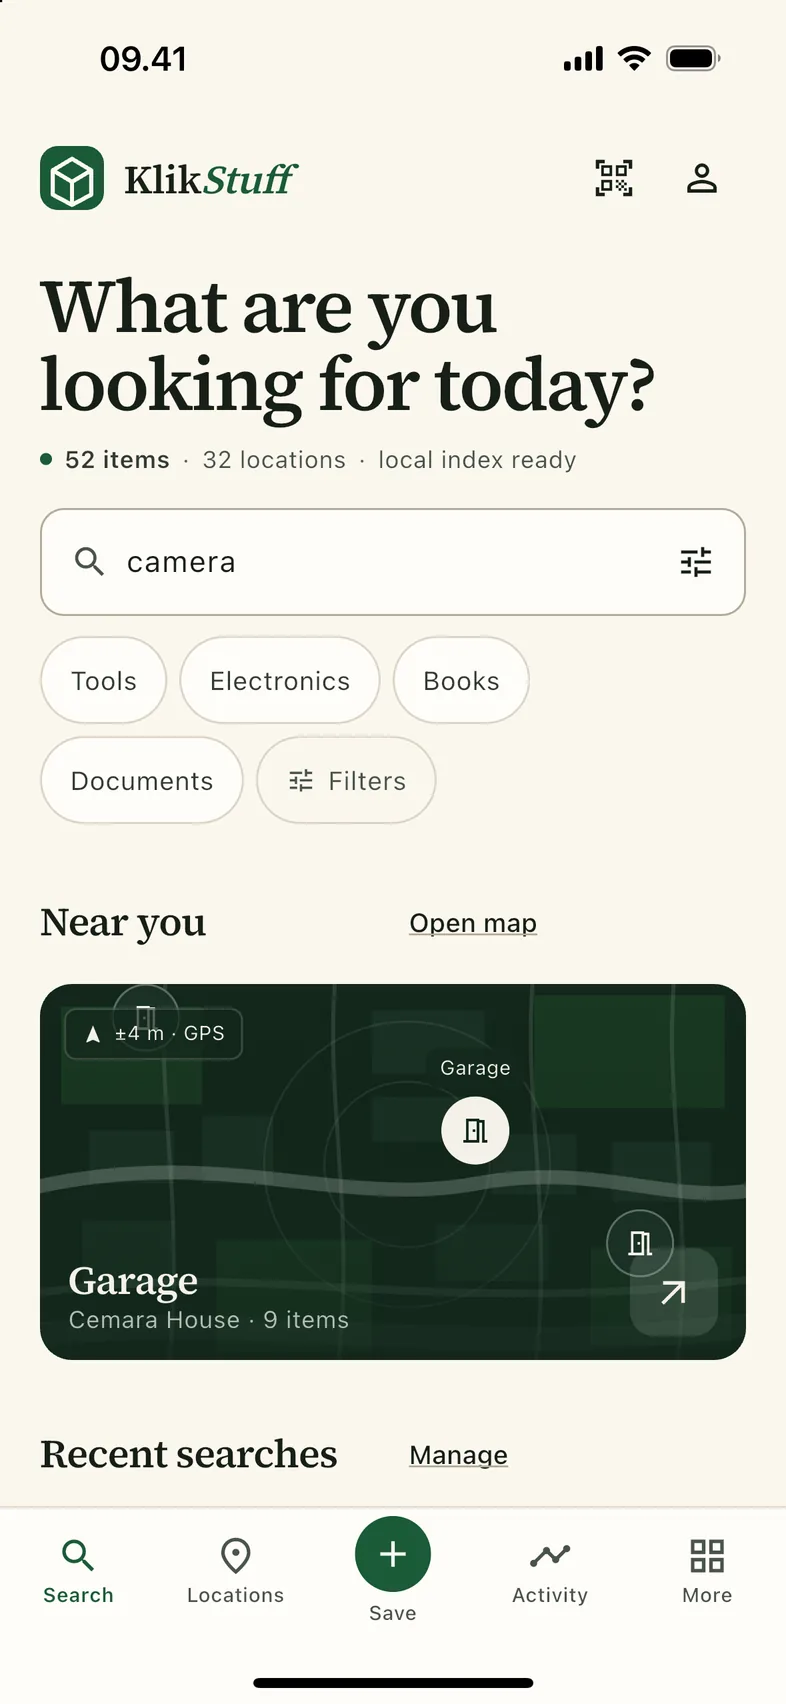
| Search field | Type a name, tag, brand or place. The filter icon on the right opens filters. |
| Category chips | One-tap searches for Tools, Electronics, Books and Documents. Filters opens the full set. |
| Near you | The recorded GPS points around your home. It is a memory aid, not live tracking. |
| Recent searches | Your last searches, kept on the device. Manage clears them. |
| Recently saved | The items you added most recently, with a shortcut to Activity. |
| Bottom bar | Search, Locations, Save (+), Activity and More. The bar stays visible on inner screens, so one tap returns to a tab's root. |
Tip: the two icons at the top right are shortcuts. The QR icon opens the box scanner and the person icon opens Settings.
Find something
Search runs entirely on the phone. It works with aeroplane mode on and never sends a query anywhere.
- Tap the search field on the home screen and type what you remember —
camera,drill,serial 44Aorgarage. - Tap search on the keyboard, or pick a category chip.
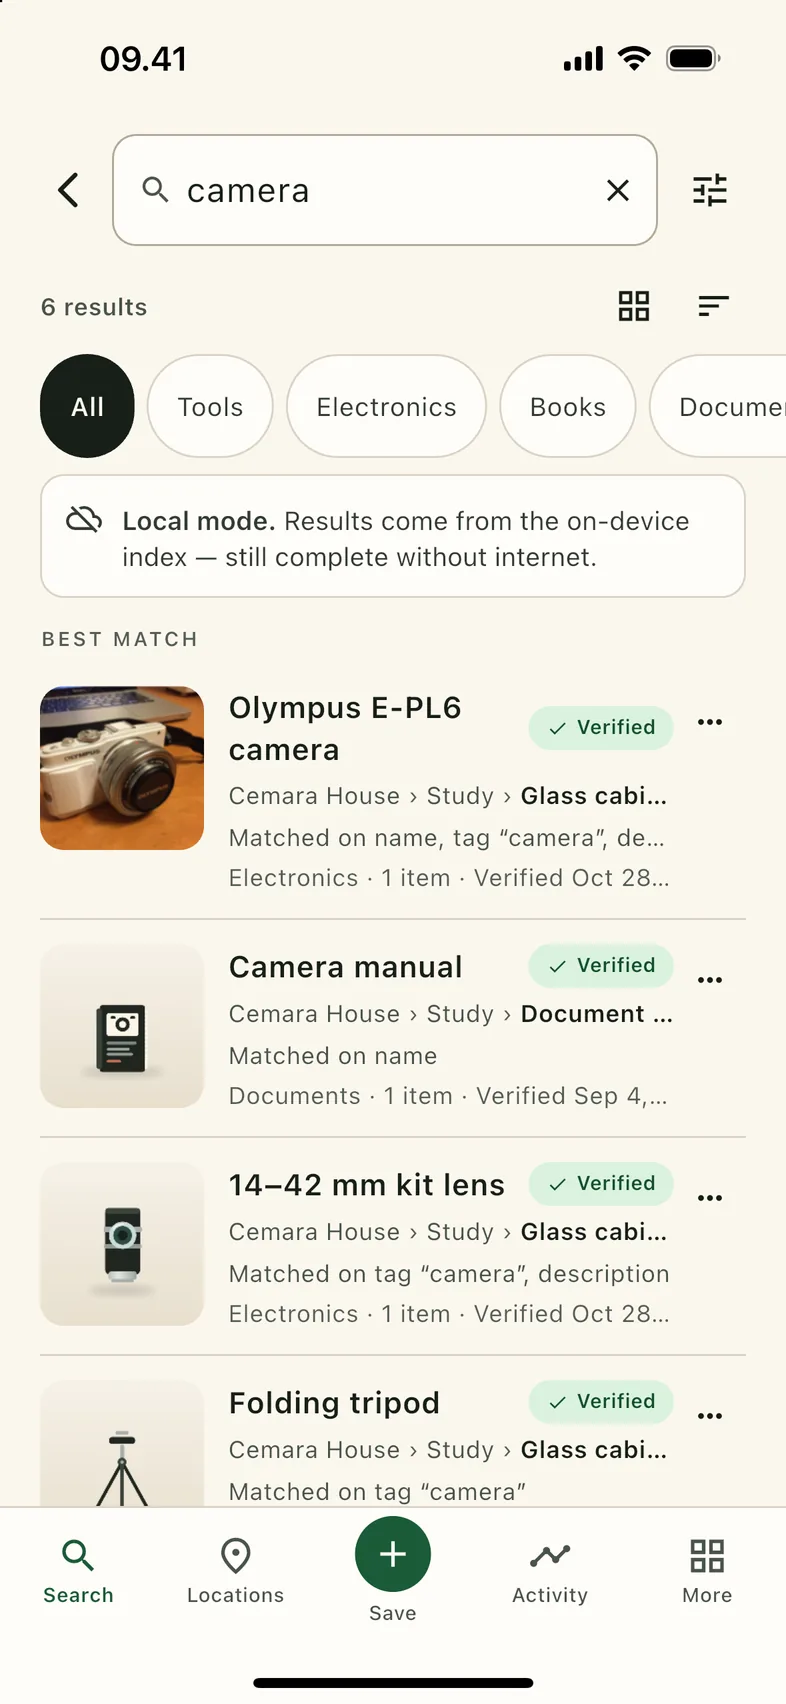
- Read the results. The best match is at the top; each row explains why it matched.
What search looks at
Name, description, category, tags, brand, model, serial number, notes and the full location path. Results are grouped into best matches and a “possibly relevant” group, so a weak match never pushes an exact one down.
| Behaviour | What to expect |
|---|---|
| Typos | Words of 3–7 characters tolerate one wrong, missing, extra or swapped letter. Eight characters or more tolerate two. Very short words are never corrected. |
| Accents and case | Diacritics and capitalisation are normalised, so Café and cafe match. |
| Location | Searching glass cabinet finds everything stored in that cabinet. |
| Evidence | Each result says what matched, for example “Matched on name, tag ‘camera’, description”. |
Tip: if a search feels too broad, add a second word that exists on the item — a colour, brand or room. Two good words beat one long phrase.
Narrow the results
Filters sit on top of a normal search, so you can start broad and tighten.
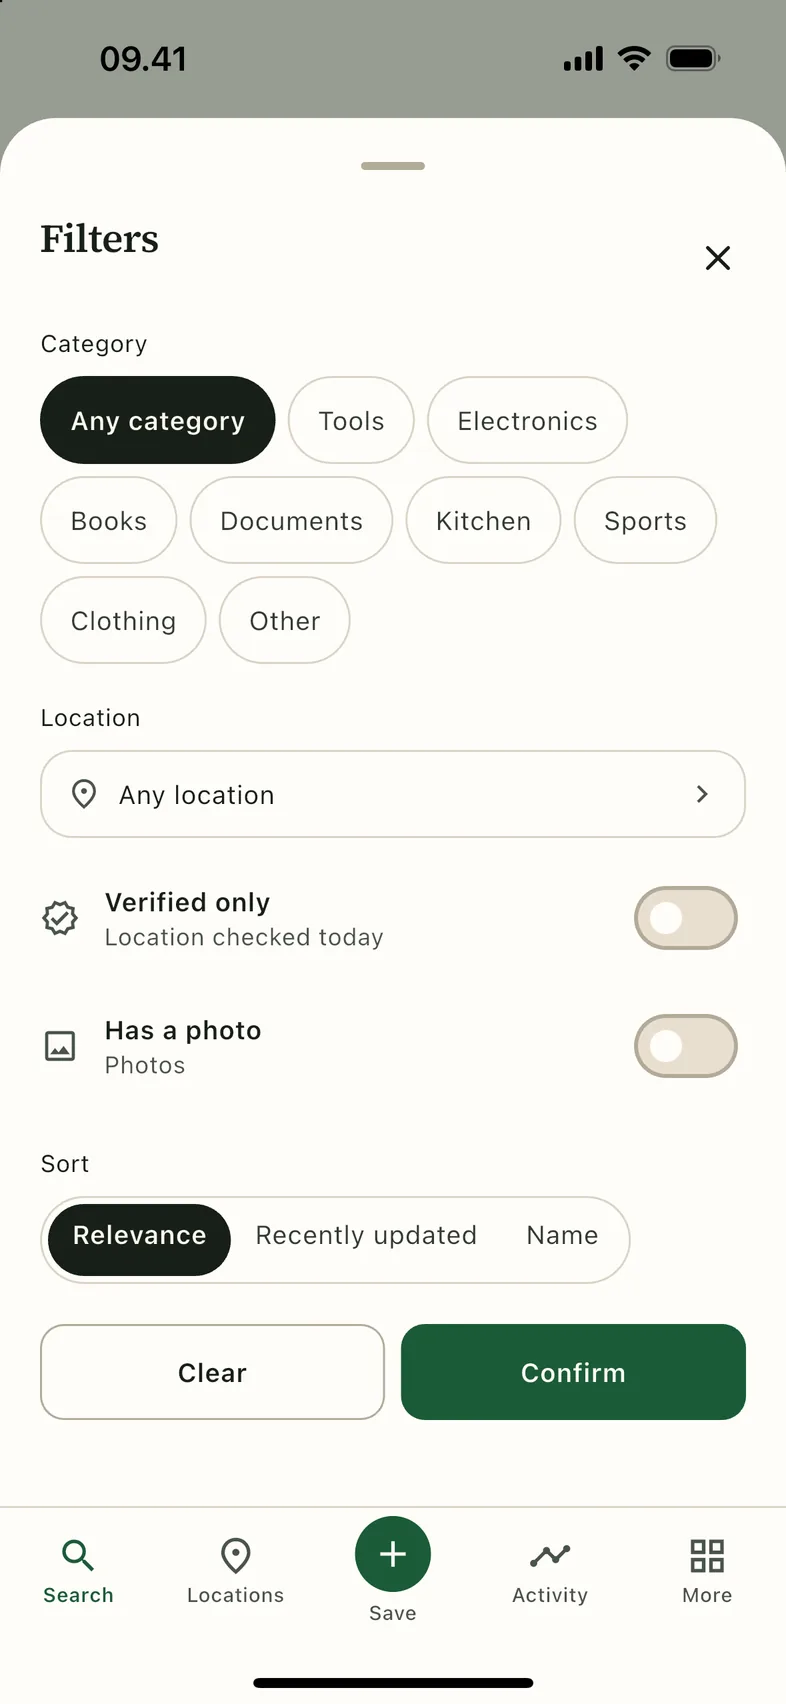
- Tap the filter icon at the right of the search field, or the Filters chip on home.
- Pick a category, or leave it on Any category.
- Pick a location to include everything inside that room or box.
- Turn on Verified only to see only items you have physically checked, or Has a photo to hide items without one.
- Choose a sort order: Relevance, Recently updated or Name.
- Tap Confirm. Your filters stay active while you move around the results.
Clear resets every filter in one tap. The search text is not affected.
Open an item
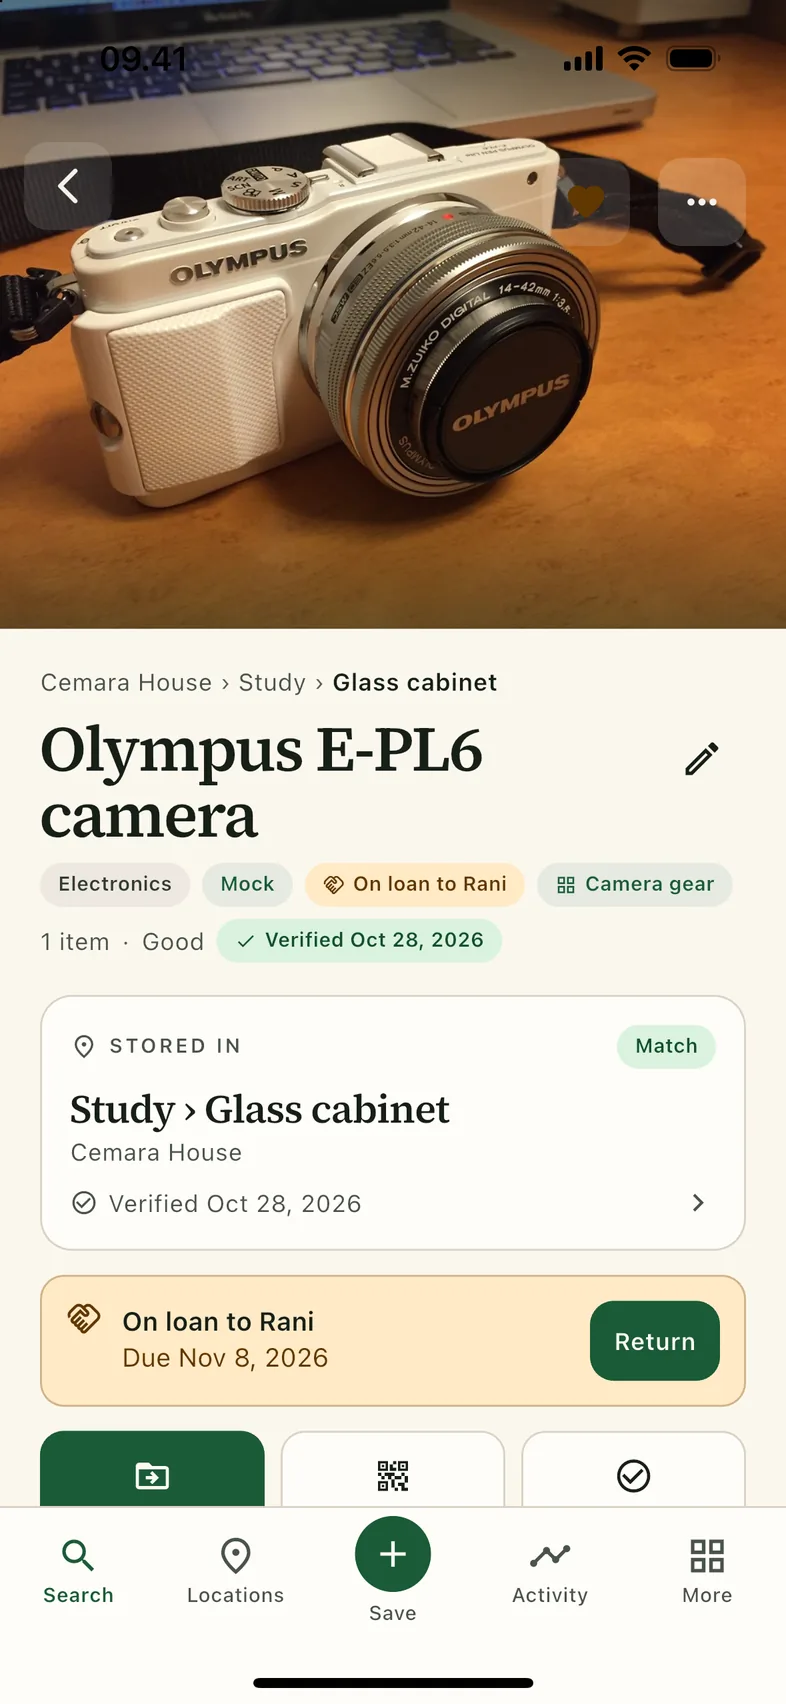
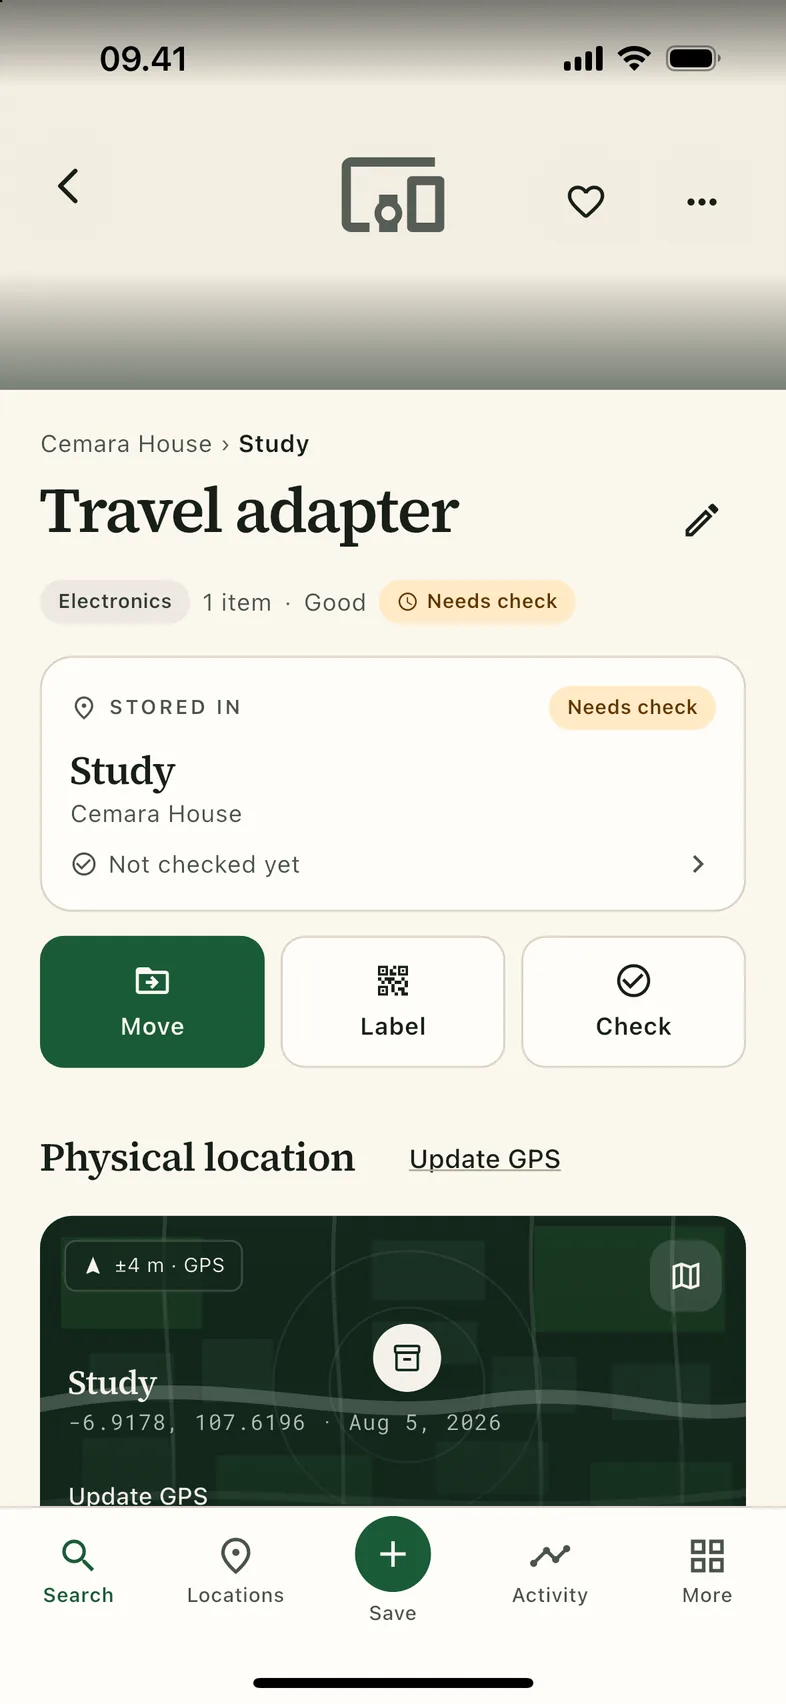
Tap any result to see the item, where it is, and everything you know about it.
| Area | What it tells you |
|---|---|
| Breadcrumb | The full path: Cemara House → Study → Glass cabinet. |
| Badges | Category, Mock (sample data), an active loan, membership of a collection. |
| Stored in | The recorded location. Match means it is stored where you said; Needs check means it has not been physically confirmed. |
| Actions | Move, Label and Check. |
| Physical location | The last GPS point for that place, with its accuracy. Indoor location stays authoritative. |
| Notes and details | Description, serial, brand, model, colour, quantity, condition, price, purchase date, warranty and value. |
| Pencil (top right) | Edit the item. ⋮ opens lend, add to collection, find similar and delete. |
Not live tracking. KlikStuff records where you put an item. It cannot ring it, follow it, or tell you that somebody moved it while you were away.
Confirm it is there
A recorded location and a verified location are different facts. KlikStuff keeps them apart on purpose.
- Walk to the place and open the item.
- Tap Check.
- The badge changes to a green Verified date and a confirmation appears. The location is now confirmed, not just remembered.
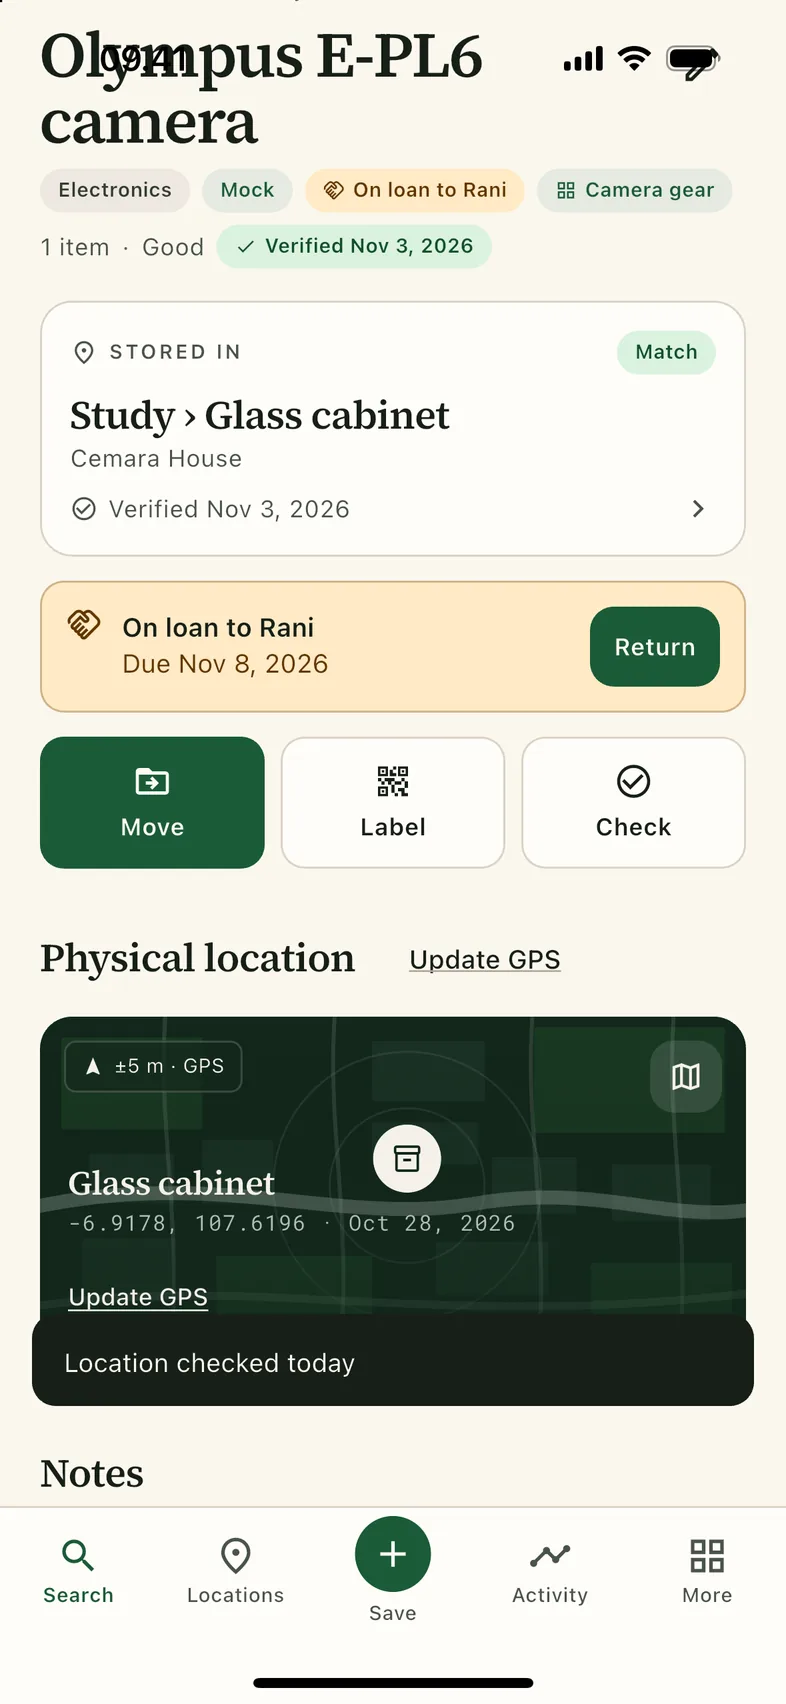
Tip: check the whole box at once from the location screen. Its Info tab shows when the place itself was last verified.
Move an item
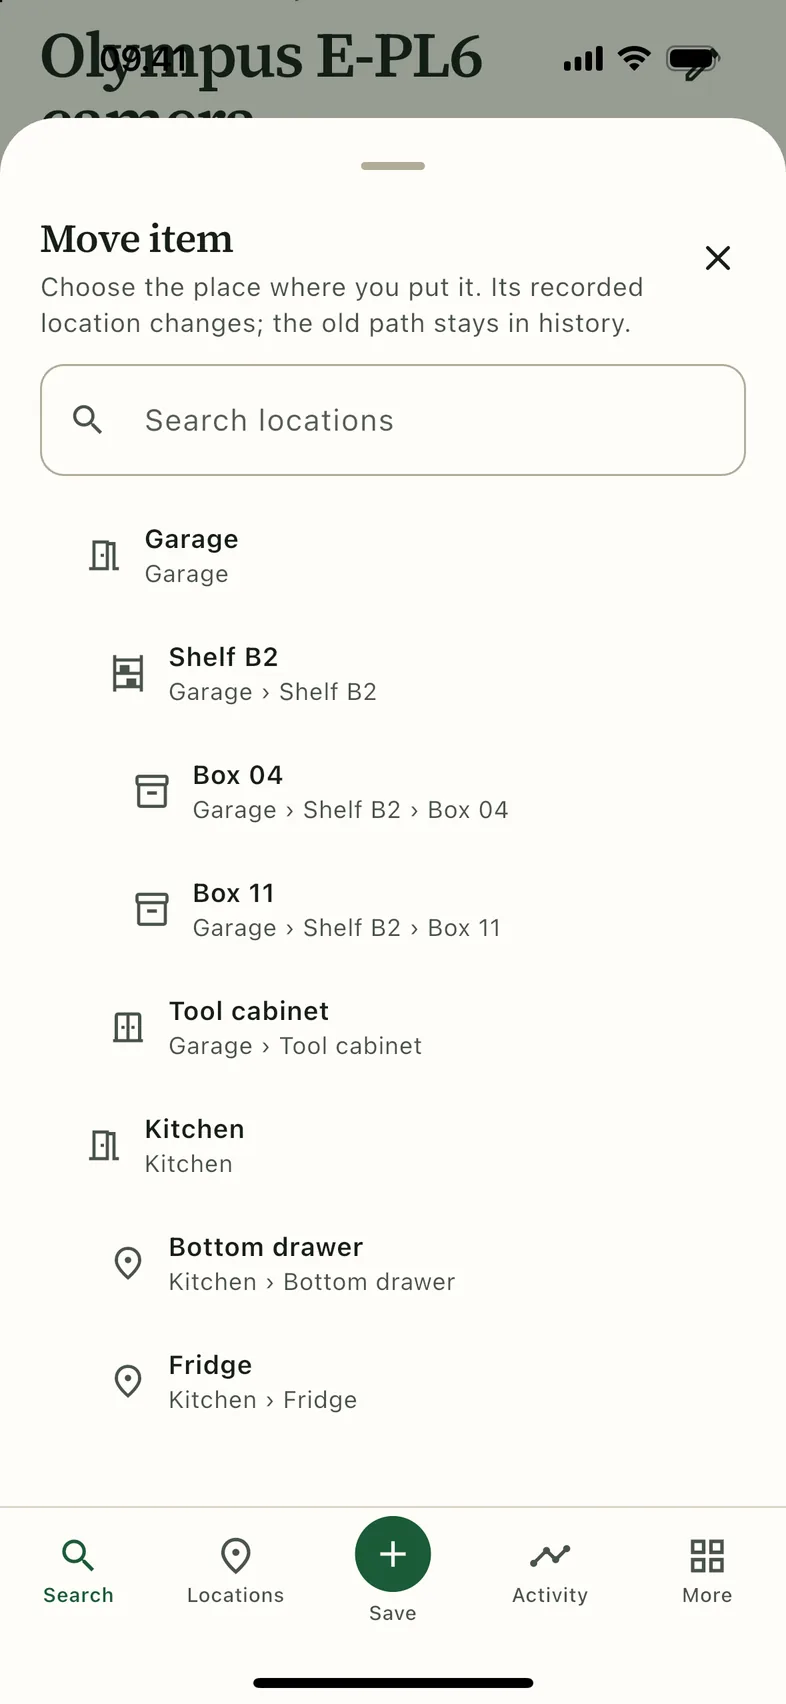
Moves are recorded, reversible, and they clear the old verification so nothing claims to be checked when it is not.
- Open the item and tap Move.
- Search for the destination, or scroll the list. The list is the same home → room → box hierarchy you browse elsewhere.
- Tap the destination, then tap Move here.
- A confirmation shows the new path with an Undo action. Tap it if you picked the wrong box.
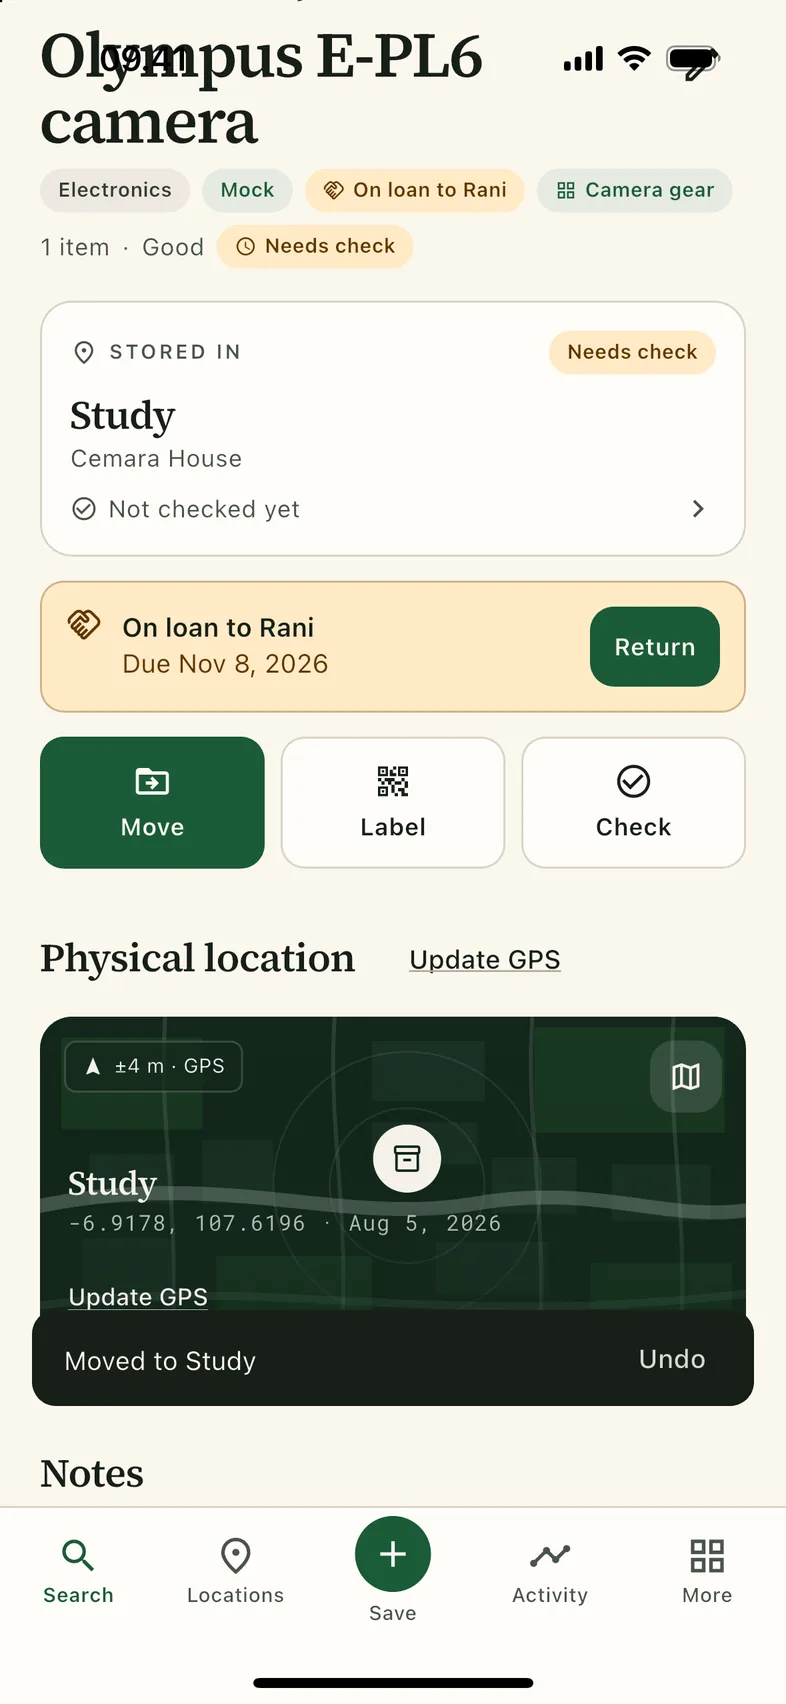
Missed the snackbar? Open Activity. Move entries keep an Undo action there too.
Add an item
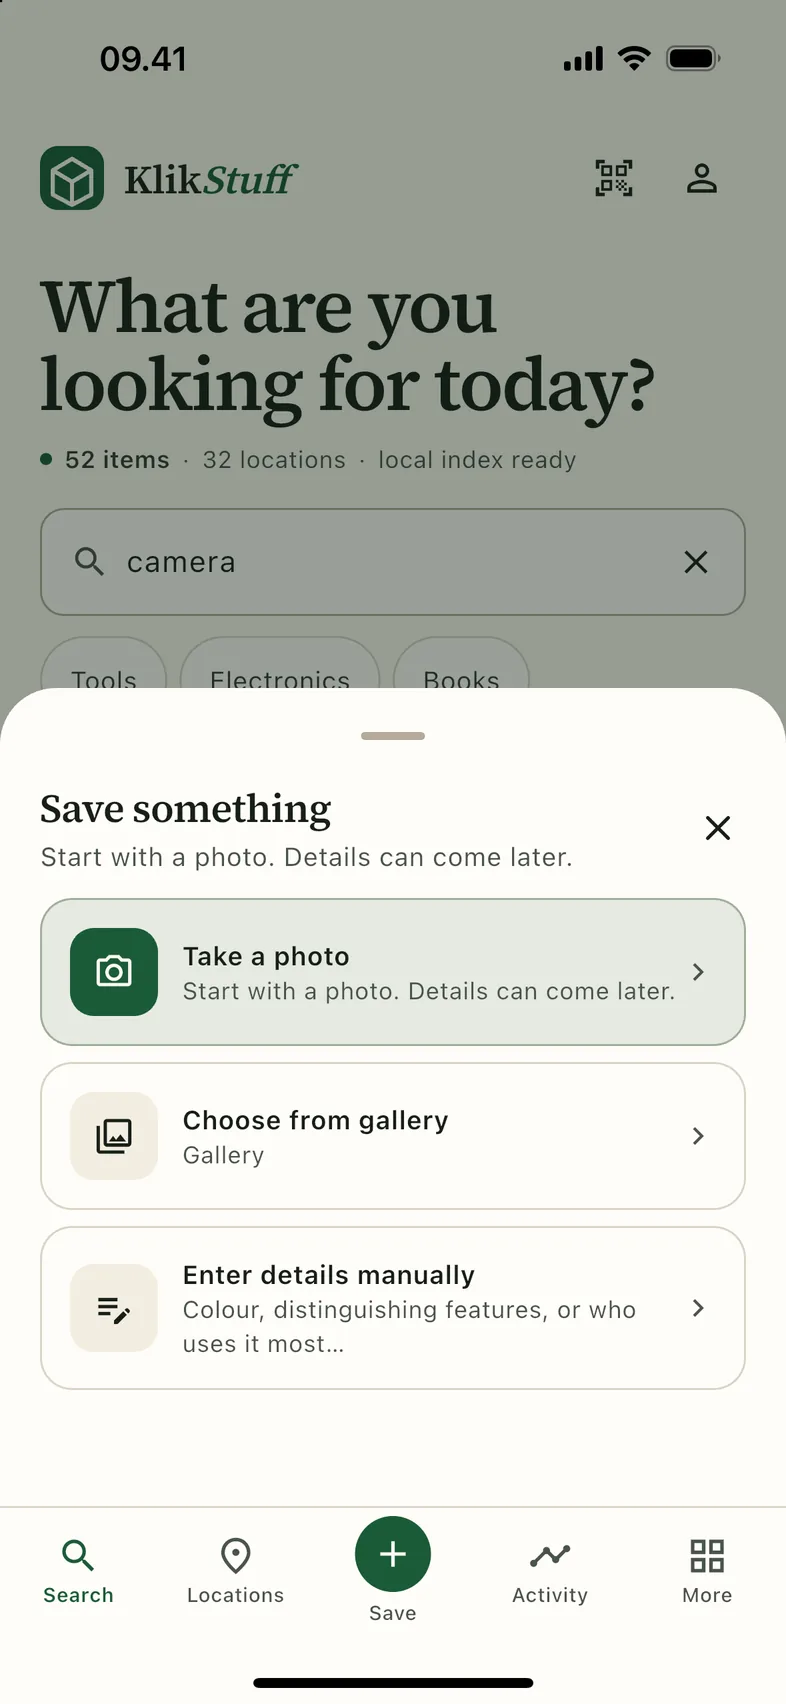
There are two ways in: a photo first, or the details first. Both end in the same form.
Start with a photo
- Tap the green + button in the bottom bar.
- Choose Take a photo, Choose from gallery, or Enter details manually.
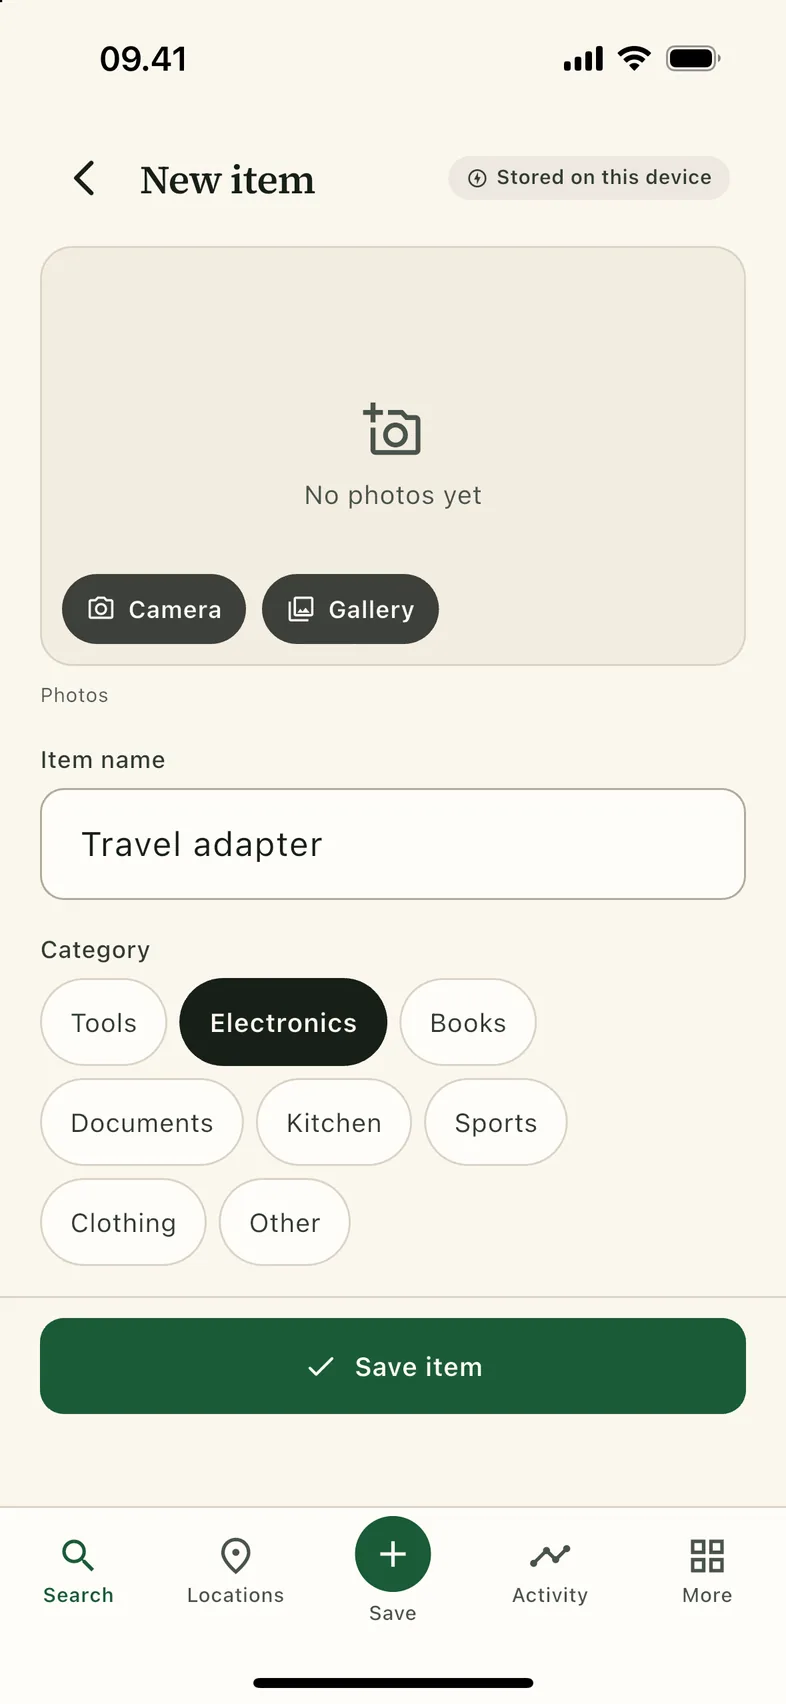
Fill in the form
- Give the item a name — required. Everything else is optional.
- Pick a category. The chips are the same categories used by filters.
- Confirm the location. It defaults to the last place you used; tap it to choose another.
- Add tags such as
travelorfragile, and a description if the name is not enough. - Open Additional details for brand, model, serial, colour, quantity, condition, prices and warranty.
- Tap Save item.
Tip: a duplicate name only produces a warning, never a block. Two identical chargers are allowed — the photo and location tell them apart.
Locations
Locations are the spine of the app. Build them the way your home is actually organised, not the way a database would.
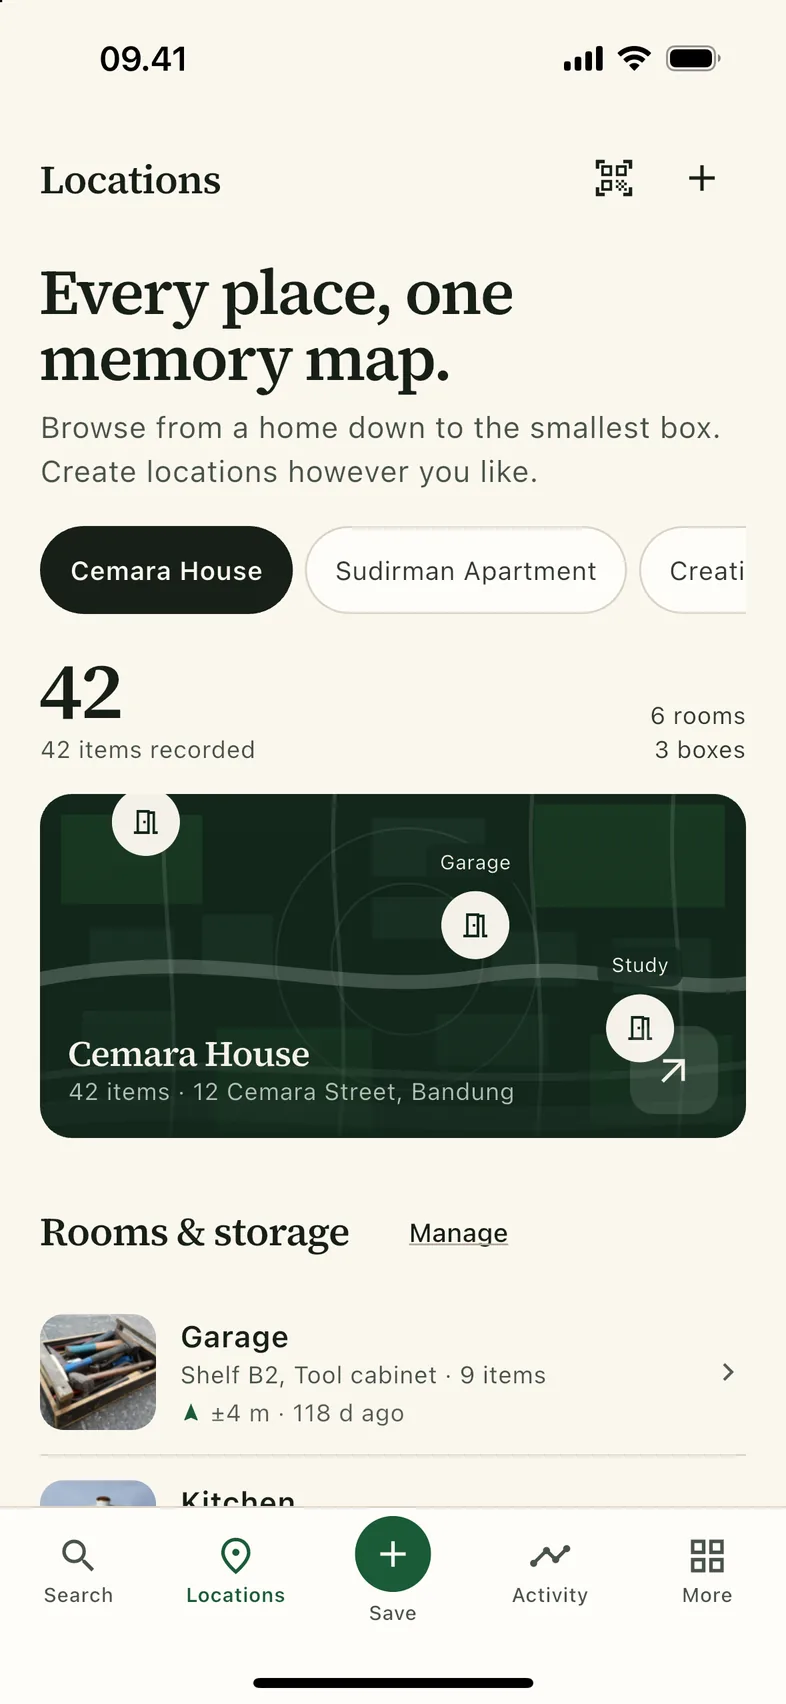
- Open the Locations tab.
- Switch between homes, warehouses or workspaces with the chips at the top.
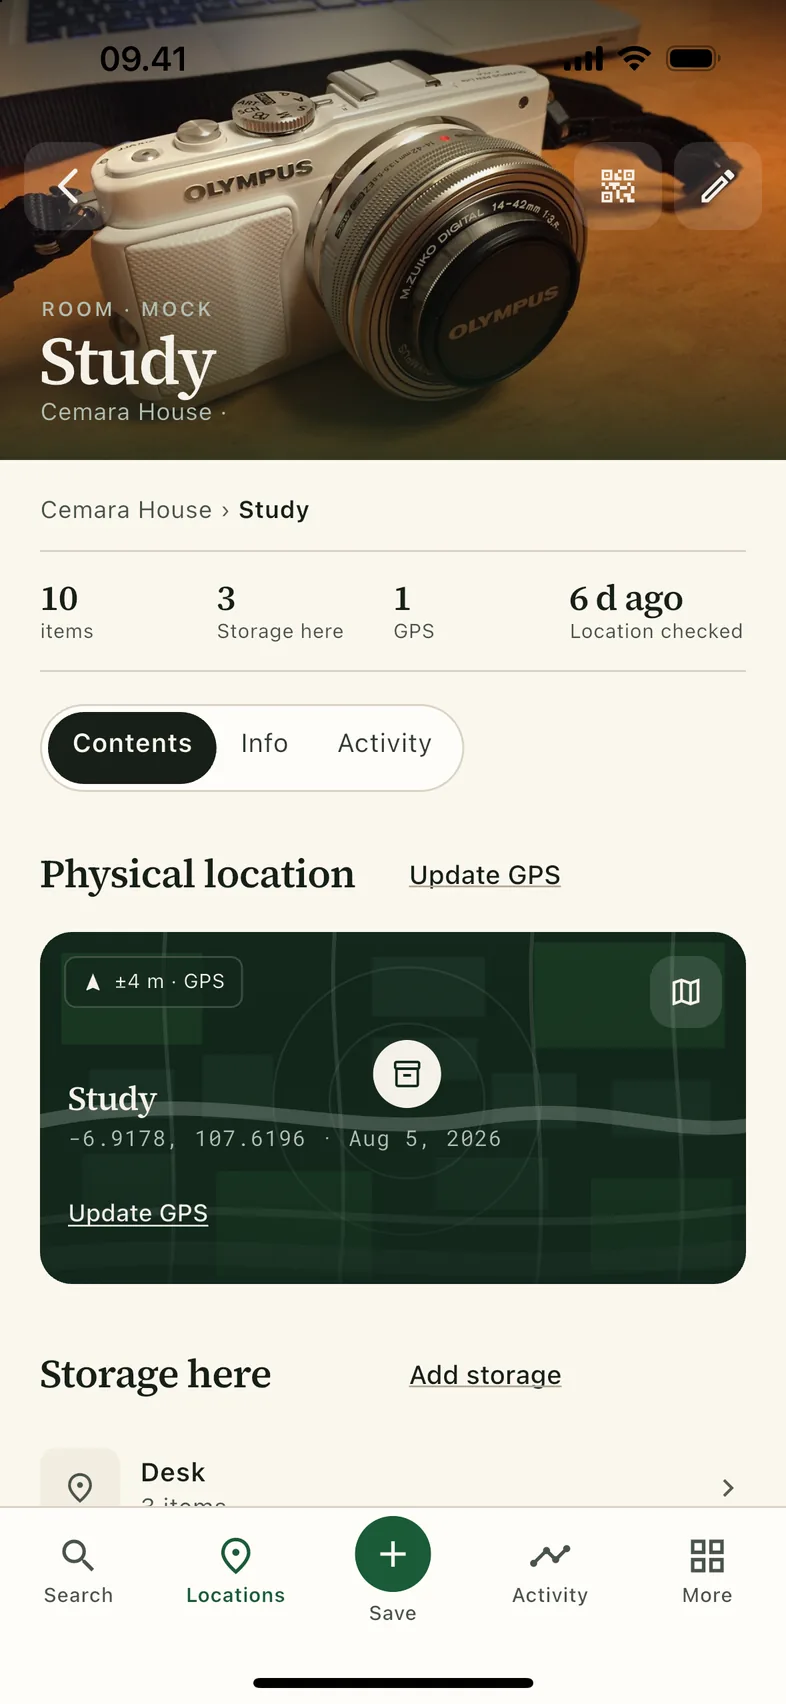
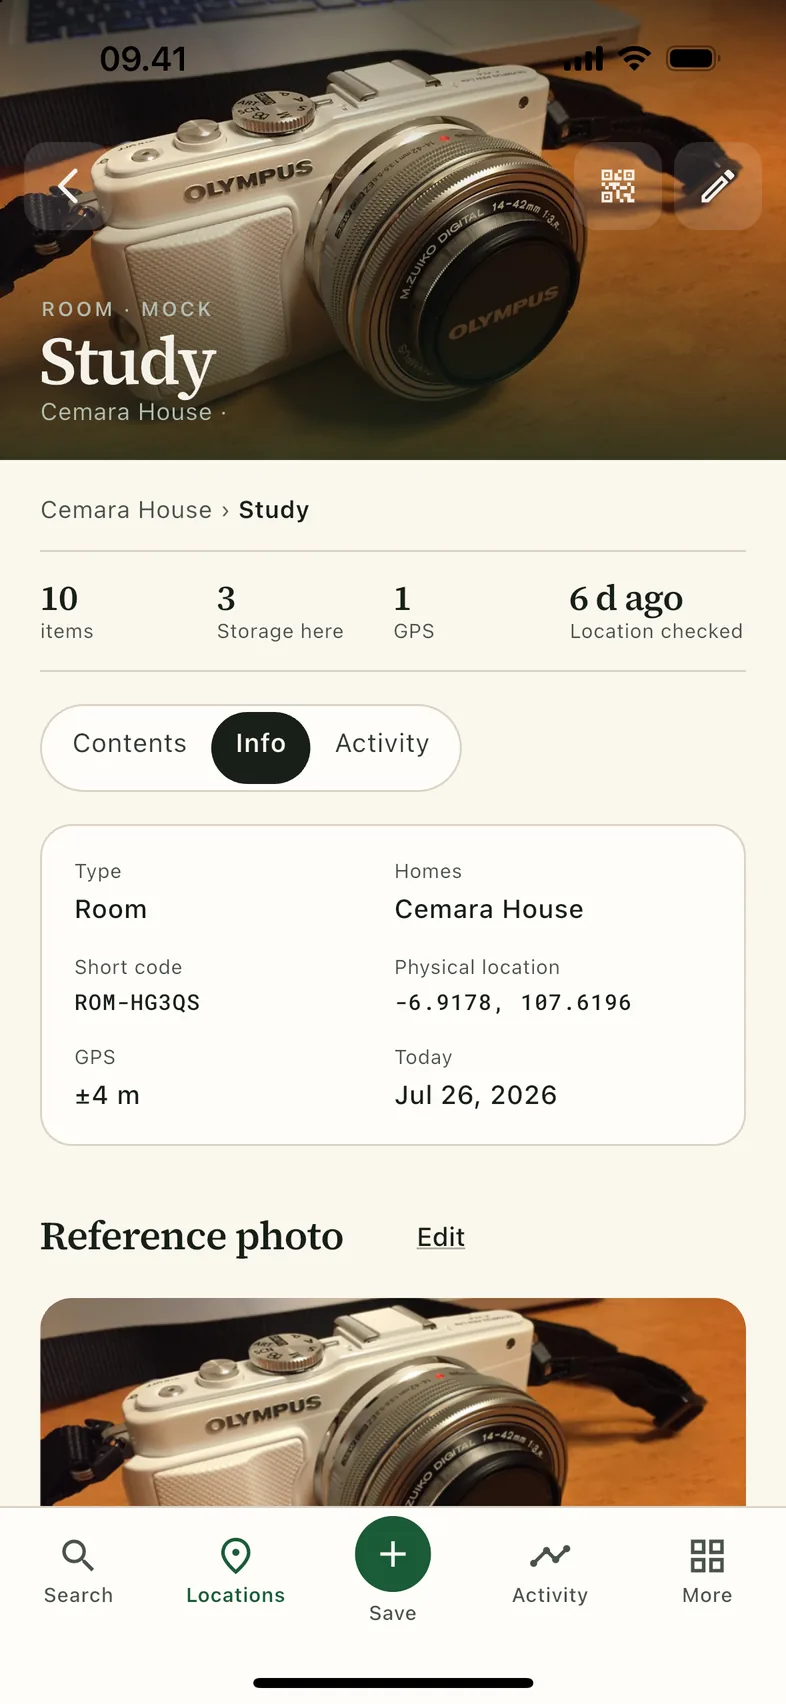
- Tap a room or box to open it. The header shows item count, storage count, GPS points and when the place was last checked.
- Use the Contents, Info and Activity tabs inside a location.
Rules that protect your data
- You can add as many homes as you need. A home contains rooms; a room contains shelves and boxes; a box contains items.
- You can move a location to a different parent, but the app refuses moves that would create a loop.
- A location can only be deleted when it is empty. Non-empty locations are blocked with an explanation instead of silently deleting the contents.
- Deleting a whole home never cascades into items. Empty it first.
Tip: name boxes the way you would say them out loud — “Box 04”, “Winter clothes”, “Camera shelf”. Search matches the full path, so a good name is a shortcut.
Box labels & QR
A label turns a sealed box into a one-scan shortcut. It is a convenience, never a requirement.
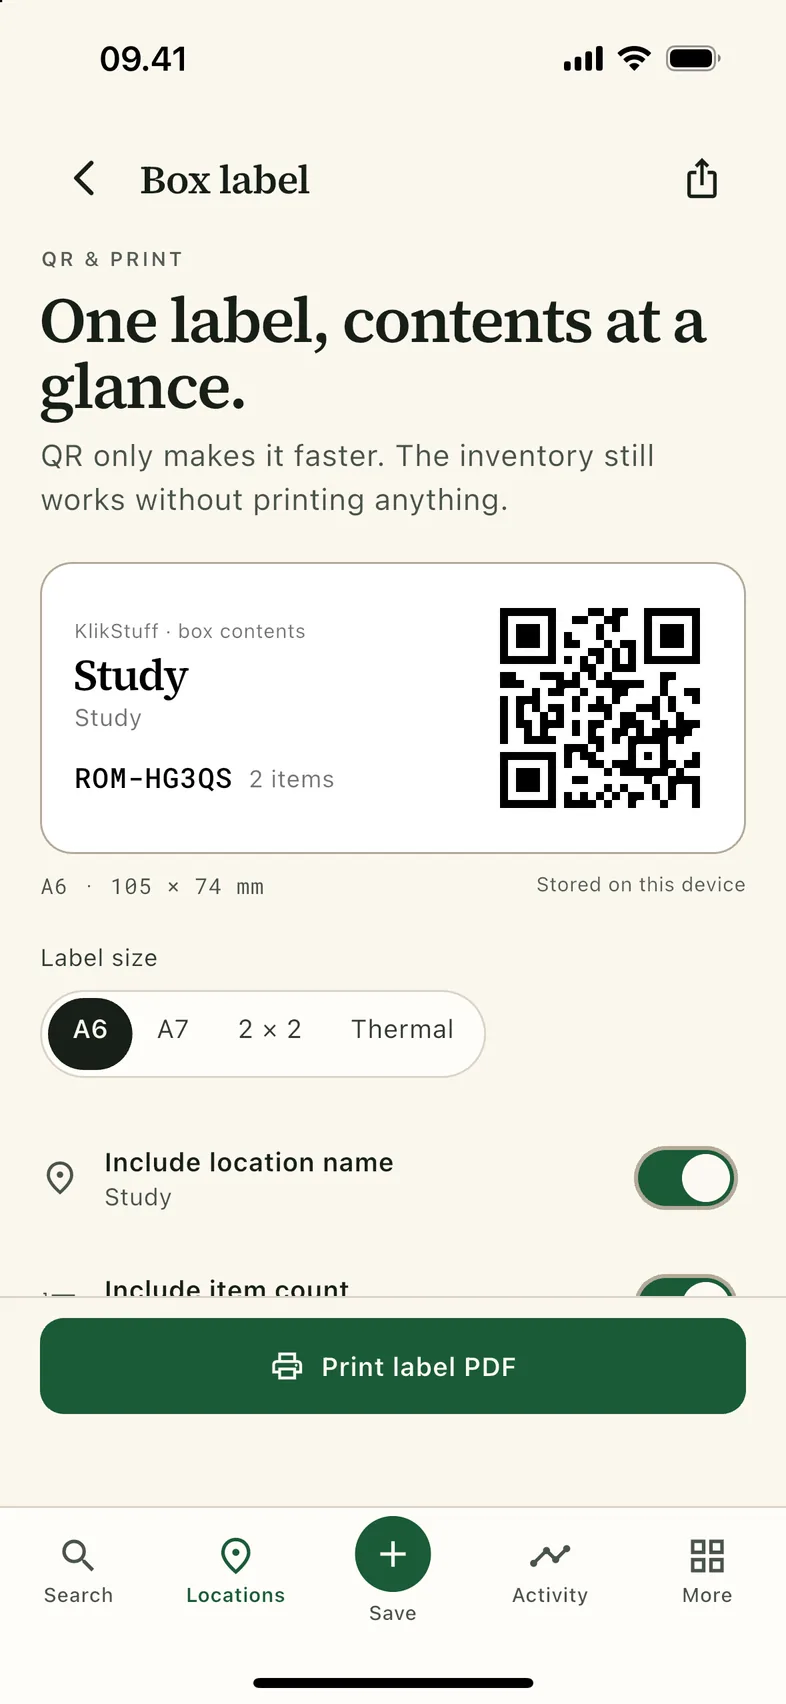
- Open a location and tap Box label. You can also use Label from an item.
- Pick a size: A6, A7, 2 × 2 or Thermal.
- Choose whether to include the location name and the item count.
- Tap Print label PDF and use your phone's print or share sheet.
- To read a label later, tap the QR icon on the home or Locations screen, or Scan box QR inside a location.
If the camera cannot be used, the scanner offers manual code entry. The short code is printed under the QR, for example ROM-CDEGN.
The label is a shortcut, not a backup. If a label is damaged, type the short code or search the box name. The inventory still works.
Activity
Every change is written locally: additions, edits, moves, checks, GPS points, loans and stock changes.
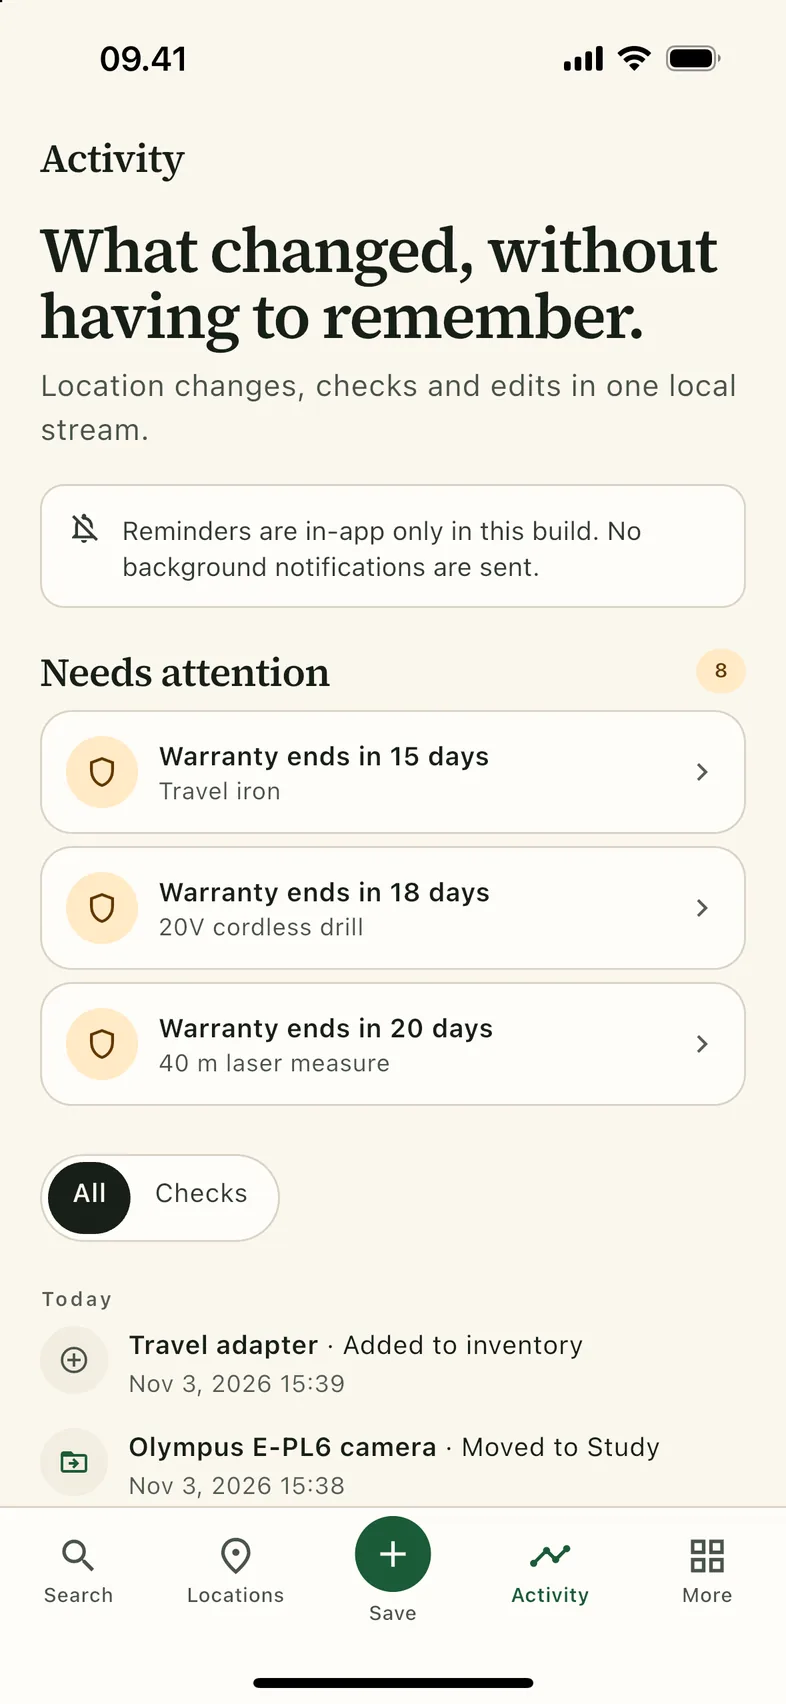
- Needs attention surfaces warranties that are ending and items whose location has not been verified.
- All shows everything; Checks narrows to verification events.
- Move entries can be undone straight from the list.
- Reminders are in-app only in this build. KlikStuff does not send background notifications.
Tip: if you cannot remember where something went, open Activity and search the last move. The old path is kept in the entry.
The More tab
Everything that is not search, locations, saving or activity lives here.
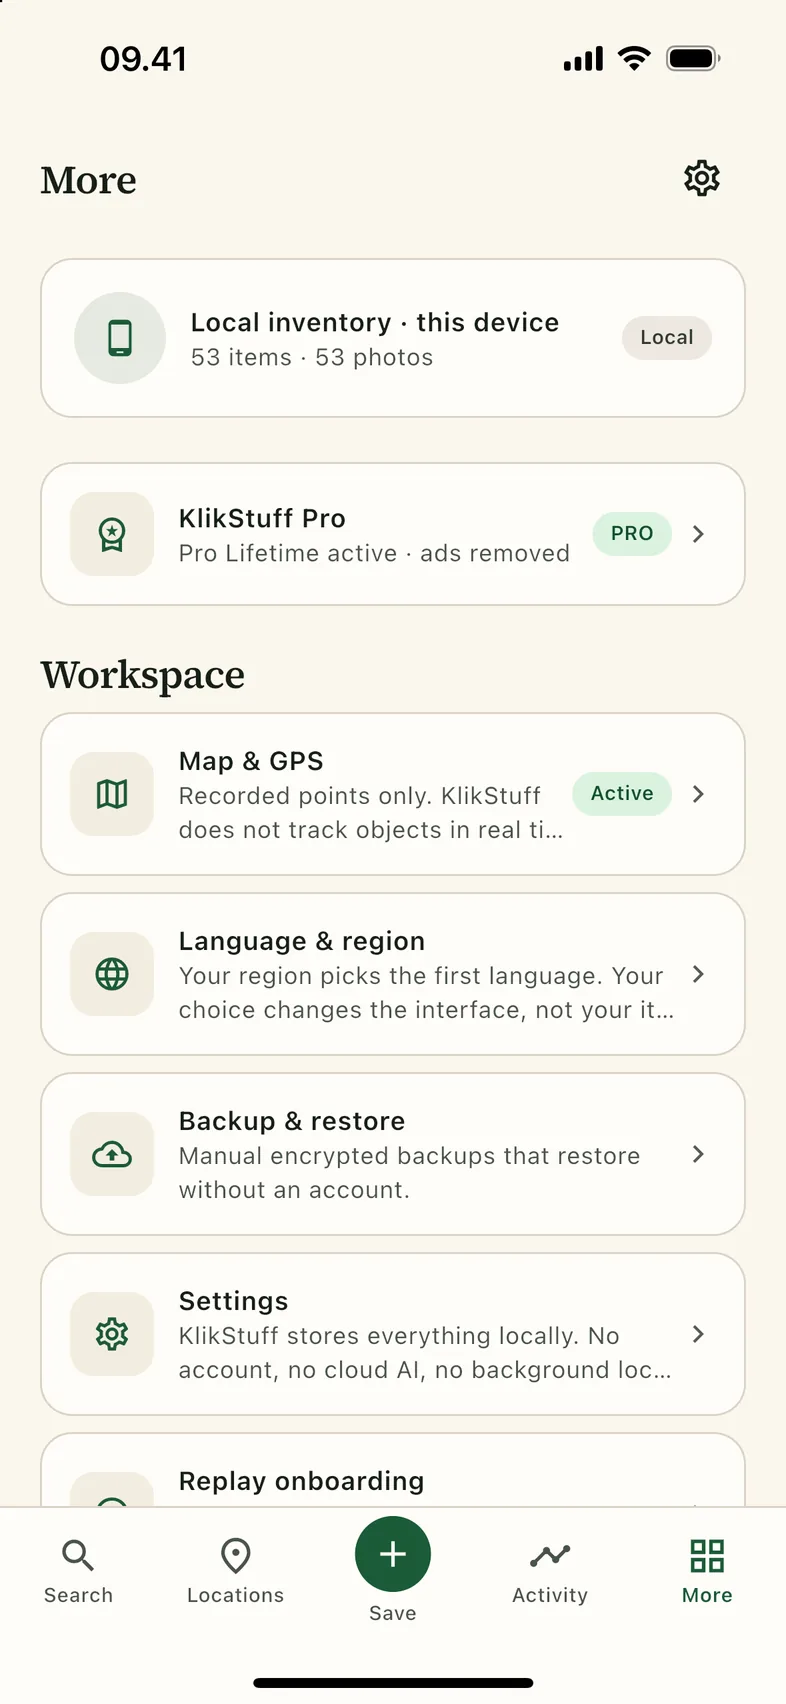
| Group | What is inside |
|---|---|
| Local inventory | How many items and photos are stored on this device. |
| KlikStuff Pro | The one-time upgrade and its current state. |
| Workspace | Map & GPS, Language & region, Backup & restore, Settings, Replay onboarding and Help & user guide. |
| Tools & insights | Moving mode, Collections, Loans & returns, Consumables, Insurance reports, Declutter and OCR & visual search. |
| Roadmap | Family sharing, shown honestly as “coming later”. It is not faked. |
Open this guide
The illustrated guide is built into the app as a link, not as a hidden website you have to find.
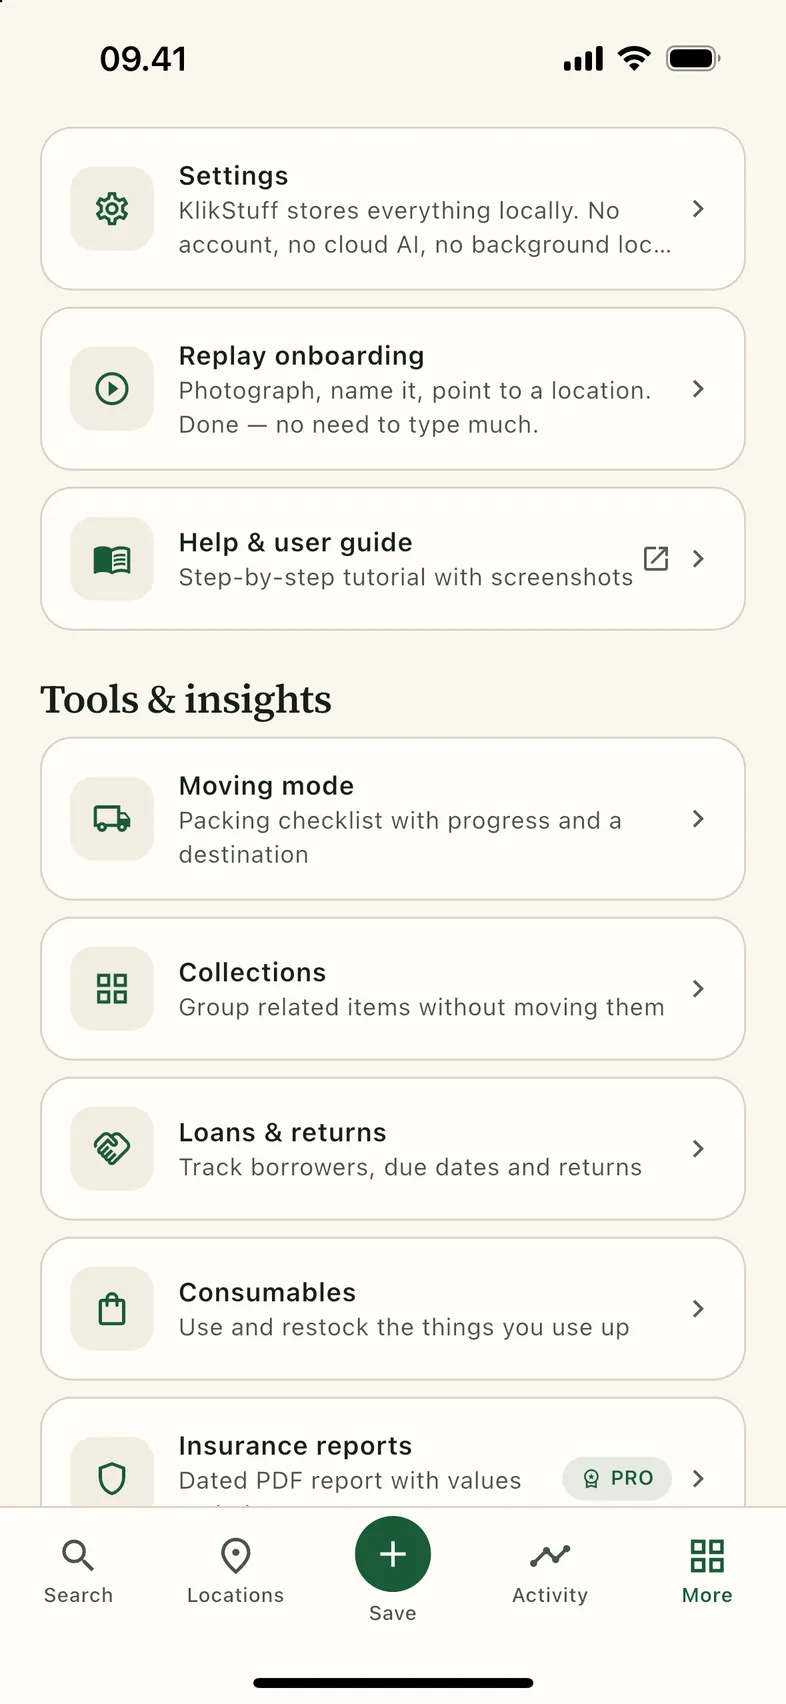
- Open the More tab.
- Scroll to Help & user guide and tap it.
- This page opens in your browser. Use the contents on the left, or the search box above it.
The same entry appears at the bottom of Settings → About, next to the privacy policy.
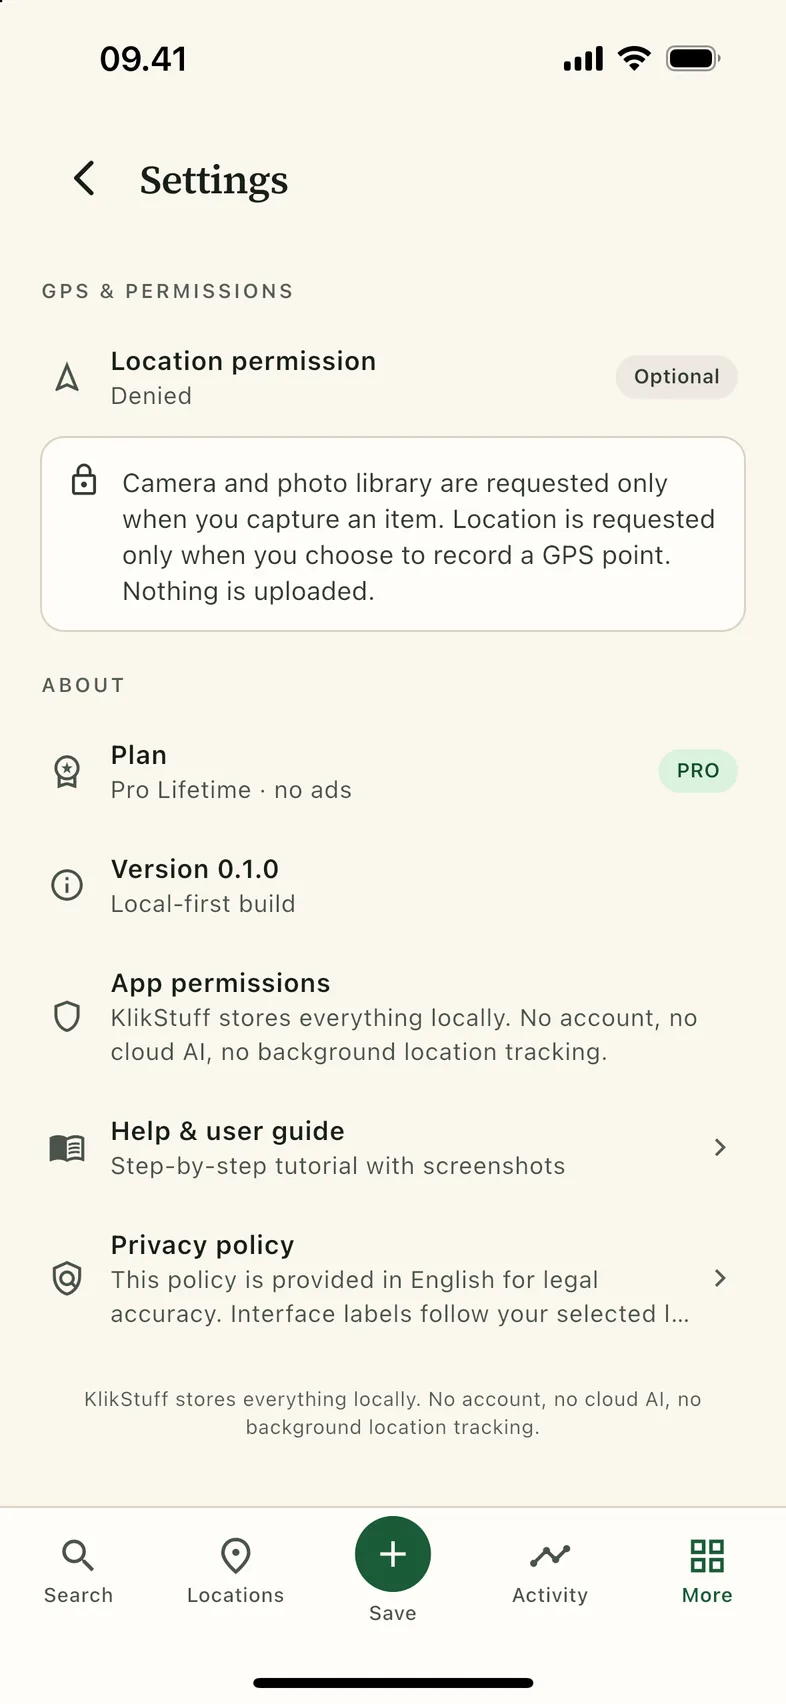
The guide opens in your browser, so reading it needs a connection the first time. KlikStuff itself stays fully usable offline.
Moving mode
A move is a list of boxes, not a memory test. Plan it, pack it, then move the packed items in one step.
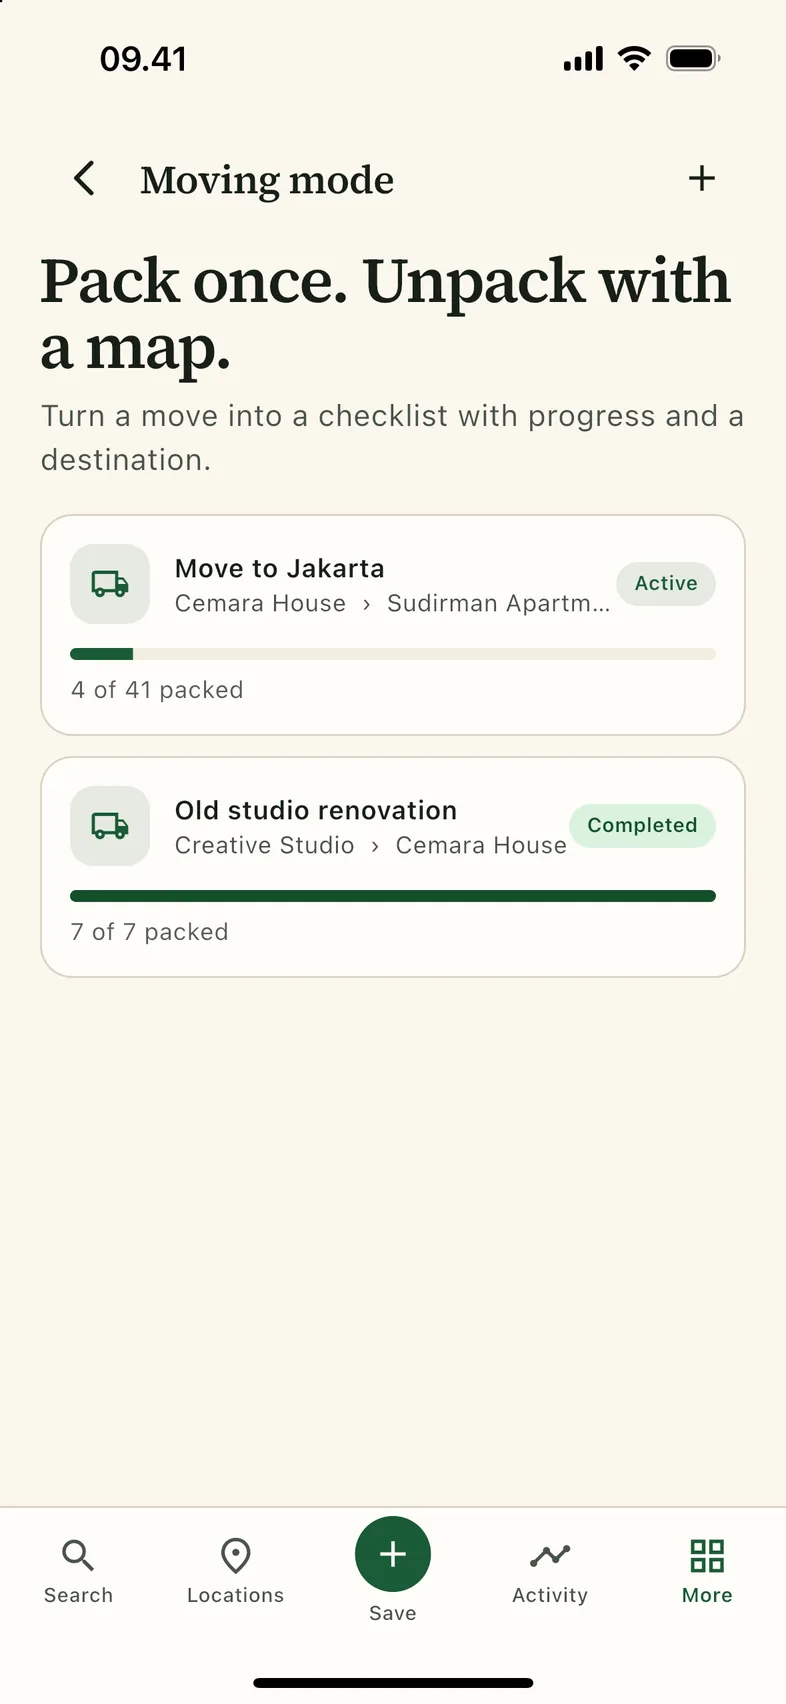
- Open More → Moving mode and tap +.
- Choose the source home, name the destination, and optionally pick a destination location.
- Open the plan and tick items as they are packed. Untick anything that is still out.
- Use Add new items to pull in things added after the plan was created — existing rows are not duplicated.
- Tap Move packed items to record every packed item at the destination.
- When everything is done, tap Complete move.
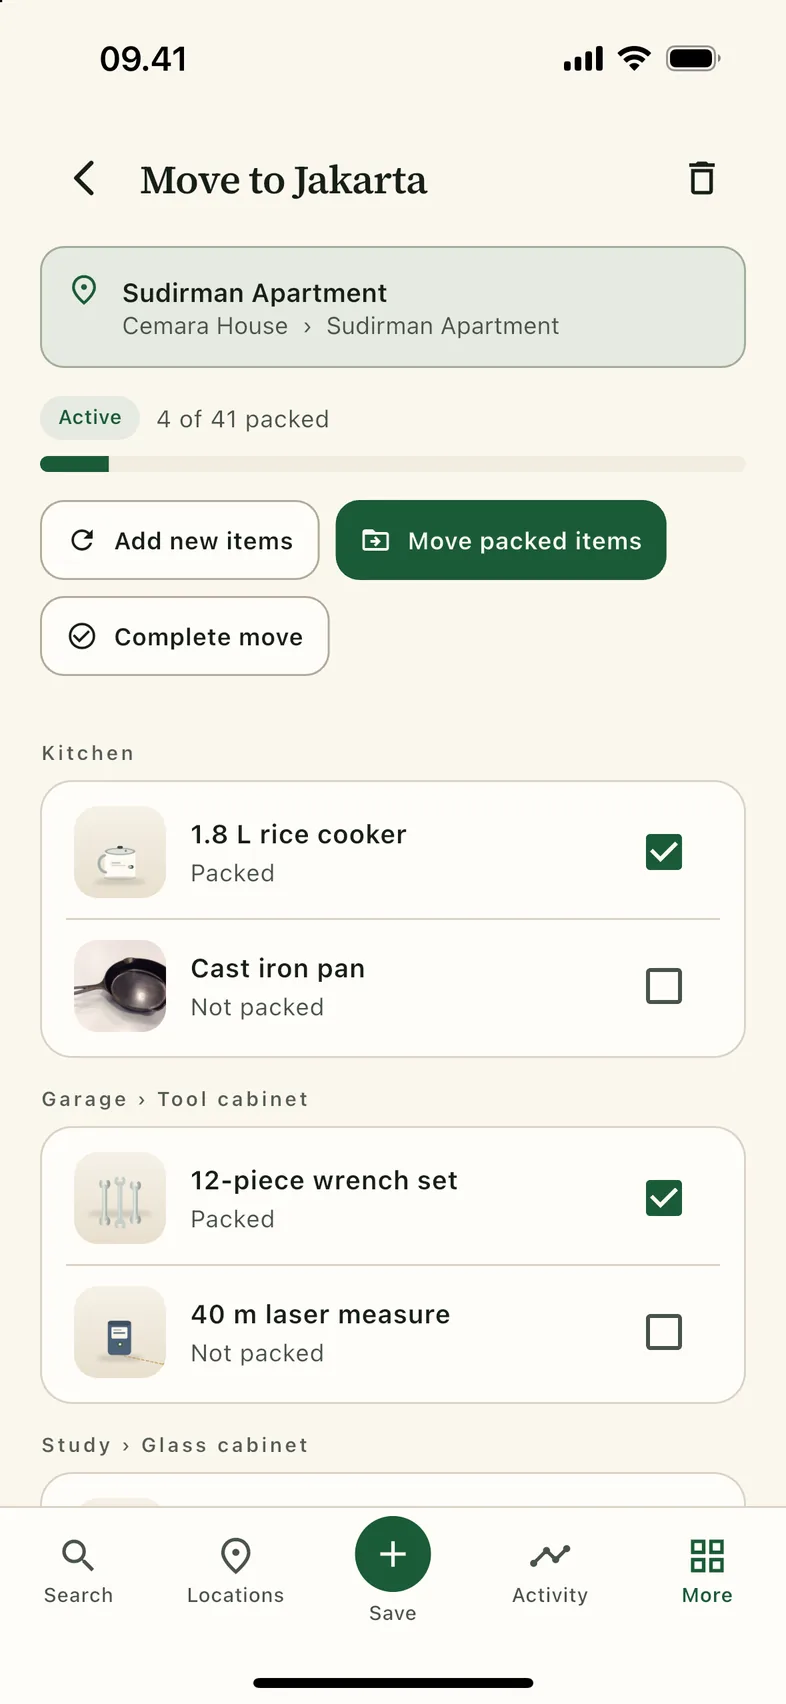
Deleting a plan never deletes items or locations. Moves made through the plan use the normal move path, so Activity can undo them.
Collections
A collection groups related items without moving or copying them. The same drill can be in “Tools” and in “Camping gear”.
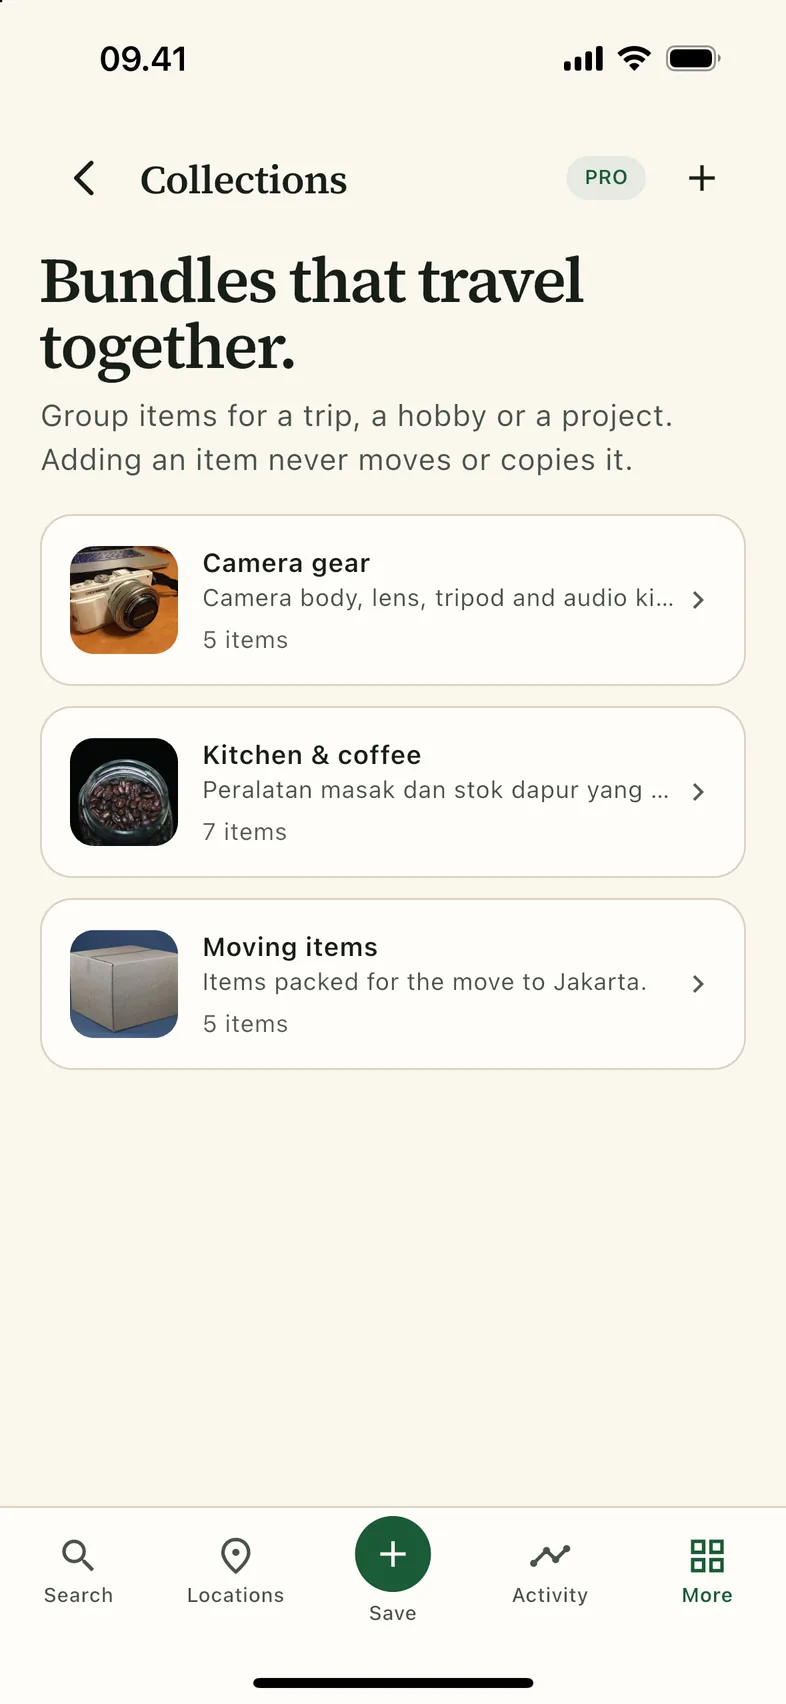
- Open More → Collections and tap +.
- Name the collection and add a short description.
- Open it and tap Add items, or add an item from its detail page with ⋮ → Add to collection.
- Remove an item from a collection with the ×. The item itself is untouched.
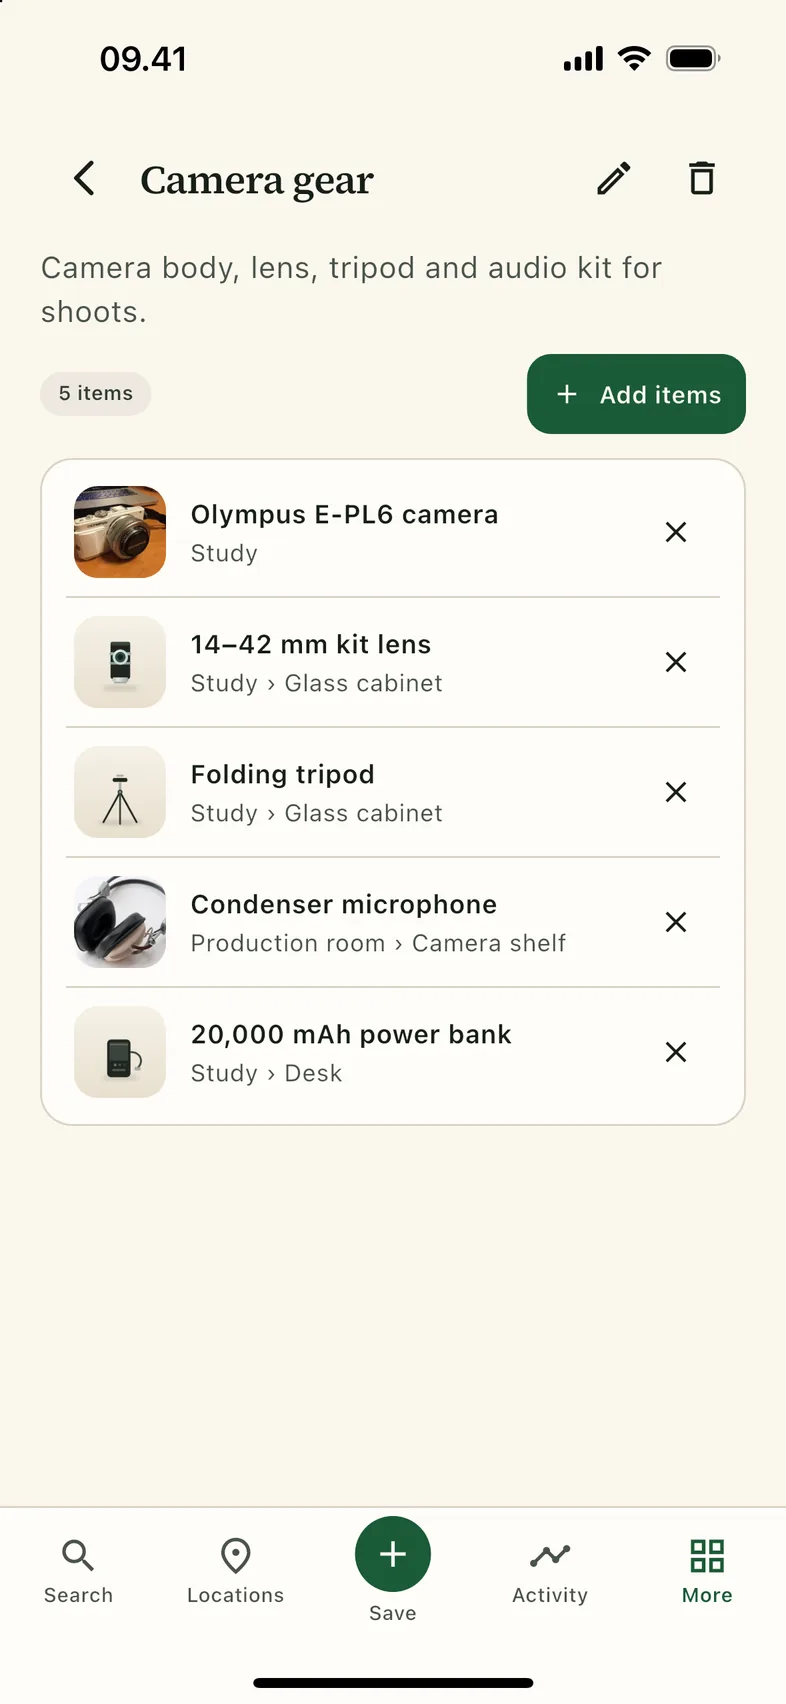
Tip: if Pro lapses, existing collections keep working. Only creating new ones is limited again.
Loans & returns
Know who has what, when it is due, and what you have already got back.
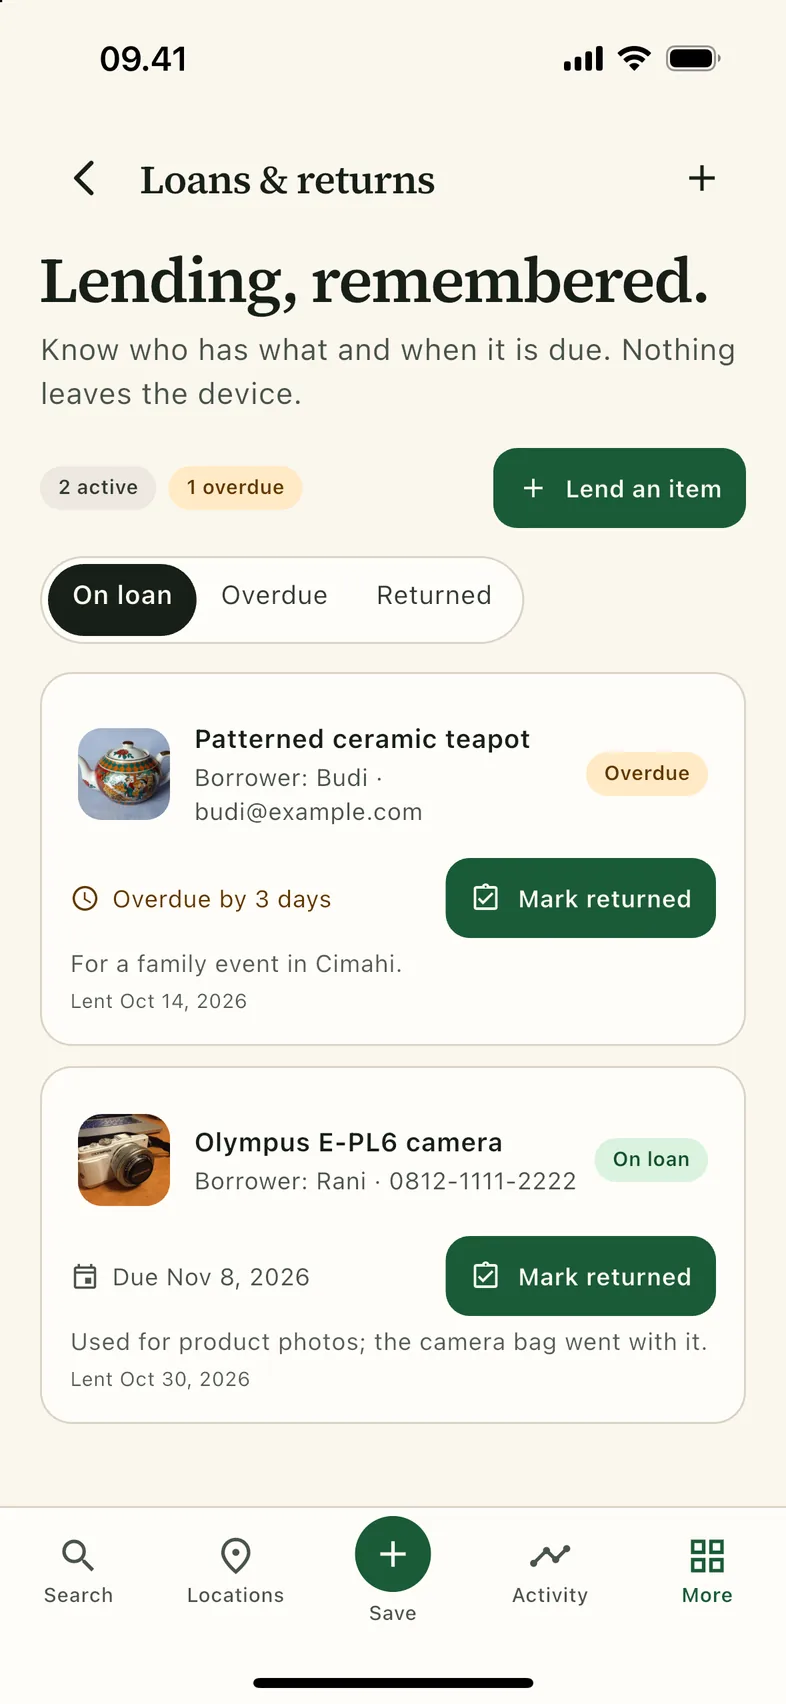
- Open More → Loans & returns and tap Lend an item.
- Pick the item, then add the borrower, an optional contact and a due date.
- When it comes back, tap Mark returned. The loan moves to Returned and the item is marked available again.
- One item can only have one active loan at a time.
- Overdue, on loan and returned are separate filters.
- Returned history stays on the device so you can check who borrowed something last year.
Loans also appear as a banner on the item's detail page, with a Return button.
Consumables
For the things that run out: printer paper, coffee filters, batteries, tape.
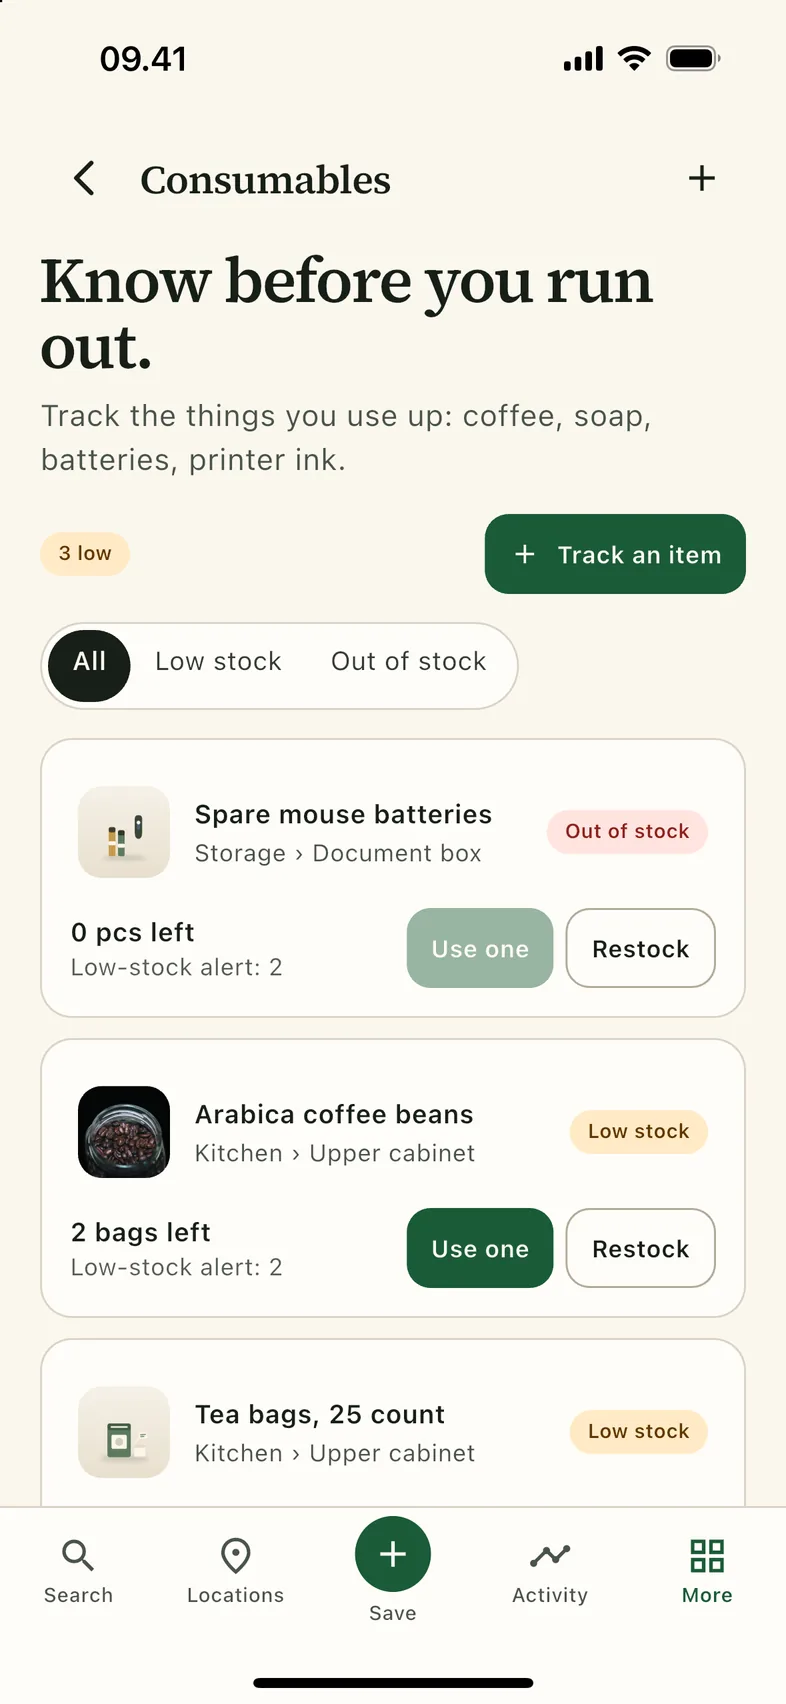
- Edit an item and mark it as consumable, then set a low-stock threshold.
- Open More → Consumables to see the list.
- Tap Use one when you take one. The count drops and an Undo action appears.
- Tap Restock to add stock back.
- Use Low stock and Out of stock to see what needs buying.
Tip: set the threshold to the number you want to see before a shopping trip, not to zero. “Low” is more useful than “empty”.
Insurance reports Pro
A dated PDF of what you own, what it is worth and where it is. Generated on the phone.
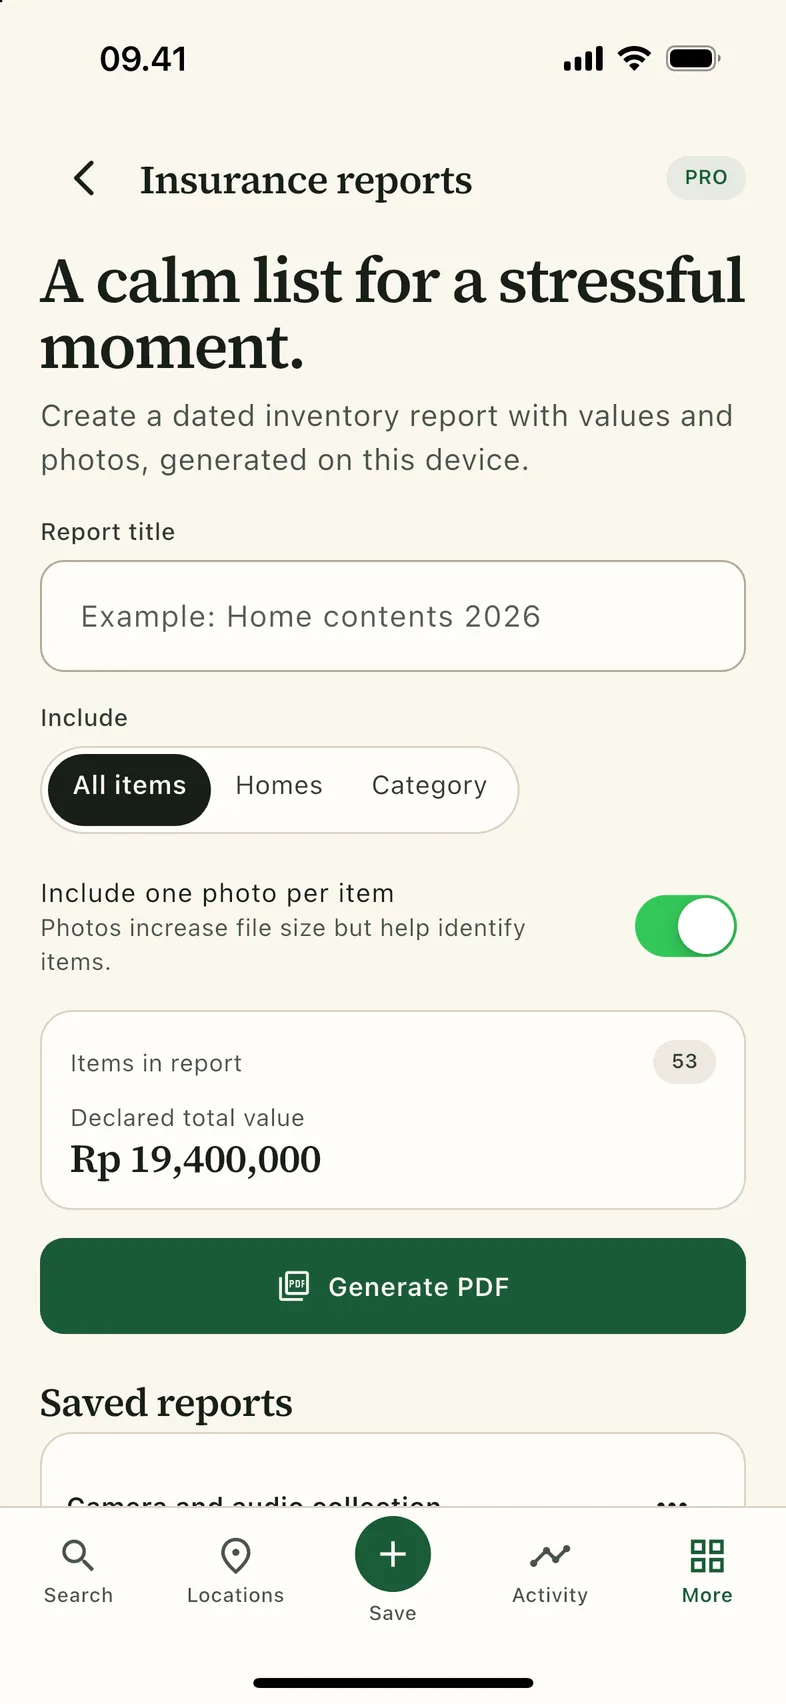
- Open More → Insurance reports.
- Give the report a title, for example
Home contents 2026. - Choose the scope: All items, Homes or Category.
- Decide whether to include one photo per item. Photos make the file larger but easier to verify.
- Tap Generate PDF, then share or print it.
- Saved reports keep their metadata, so you can re-share or delete a report without touching the inventory.
- Totals in different currencies are listed separately.
- Values are the owner's declarations. The report says so explicitly.
PDF core fonts are Latin-only in this build. Item names in CJK or Devanagari scripts may not render correctly in the generated report.
Declutter Pro
A gentle review of the things you have not seen in a while. Nothing is deleted automatically.
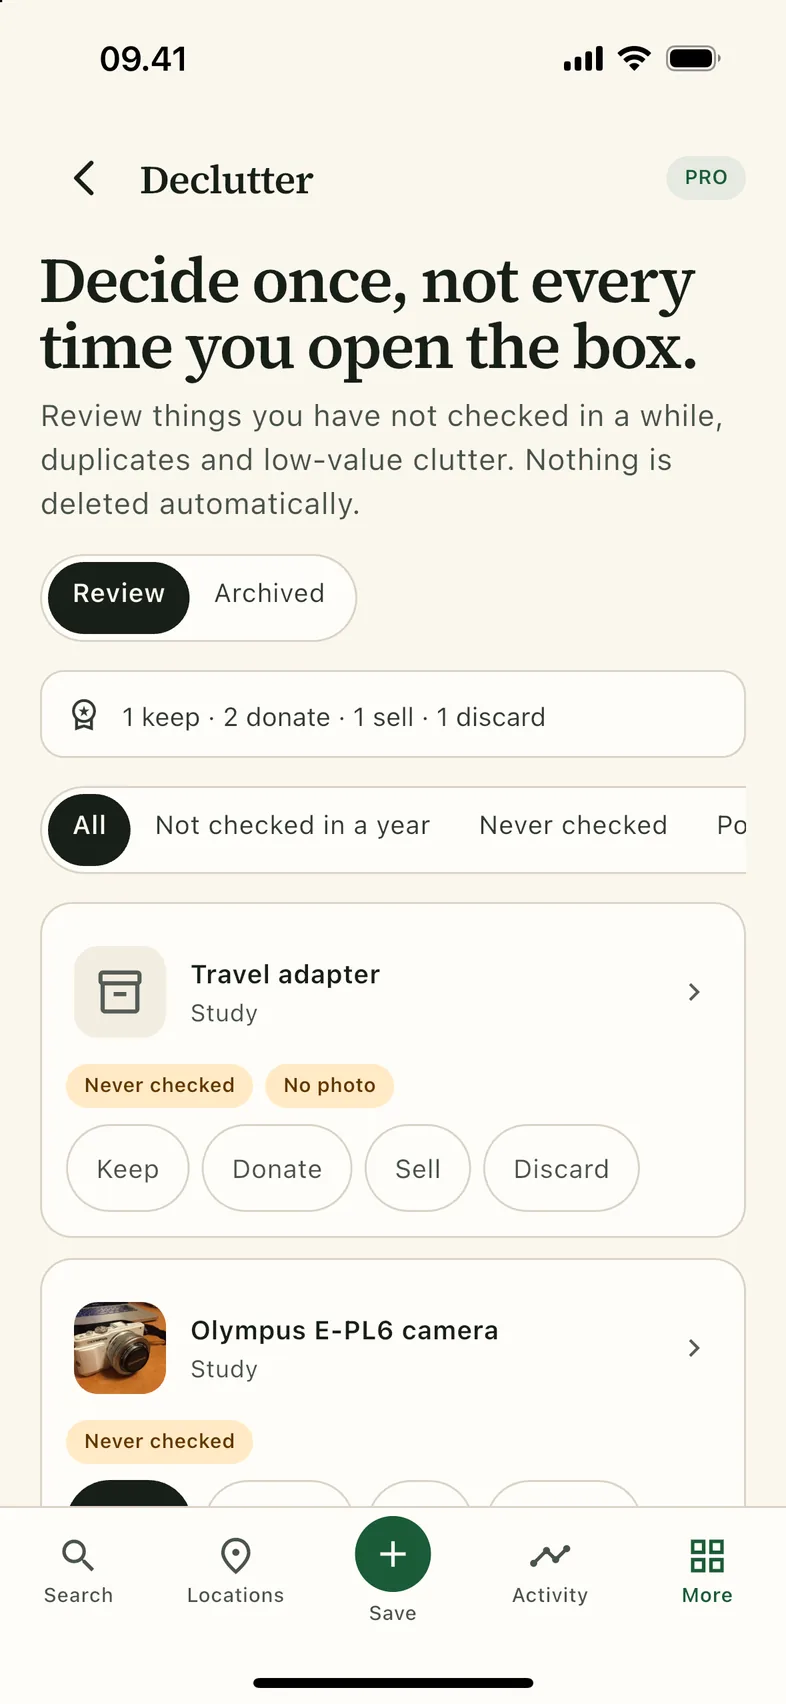
- Open More → Declutter.
- Review the groups: not checked in a year, never checked, likely duplicates, no photo, or items you already marked.
- Tap Keep, Donate, Sell or Discard for each item.
- Tap Archive marked items to hide donate, sell and discard items from search and lists.
- Open the Archived tab to restore anything you change your mind about.
Archiving is not deleting. The item and its photos stay on the device until you delete them yourself.
OCR & visual search Pro
Find text inside your photos, and find photos that look like another photo. Both run on the device.
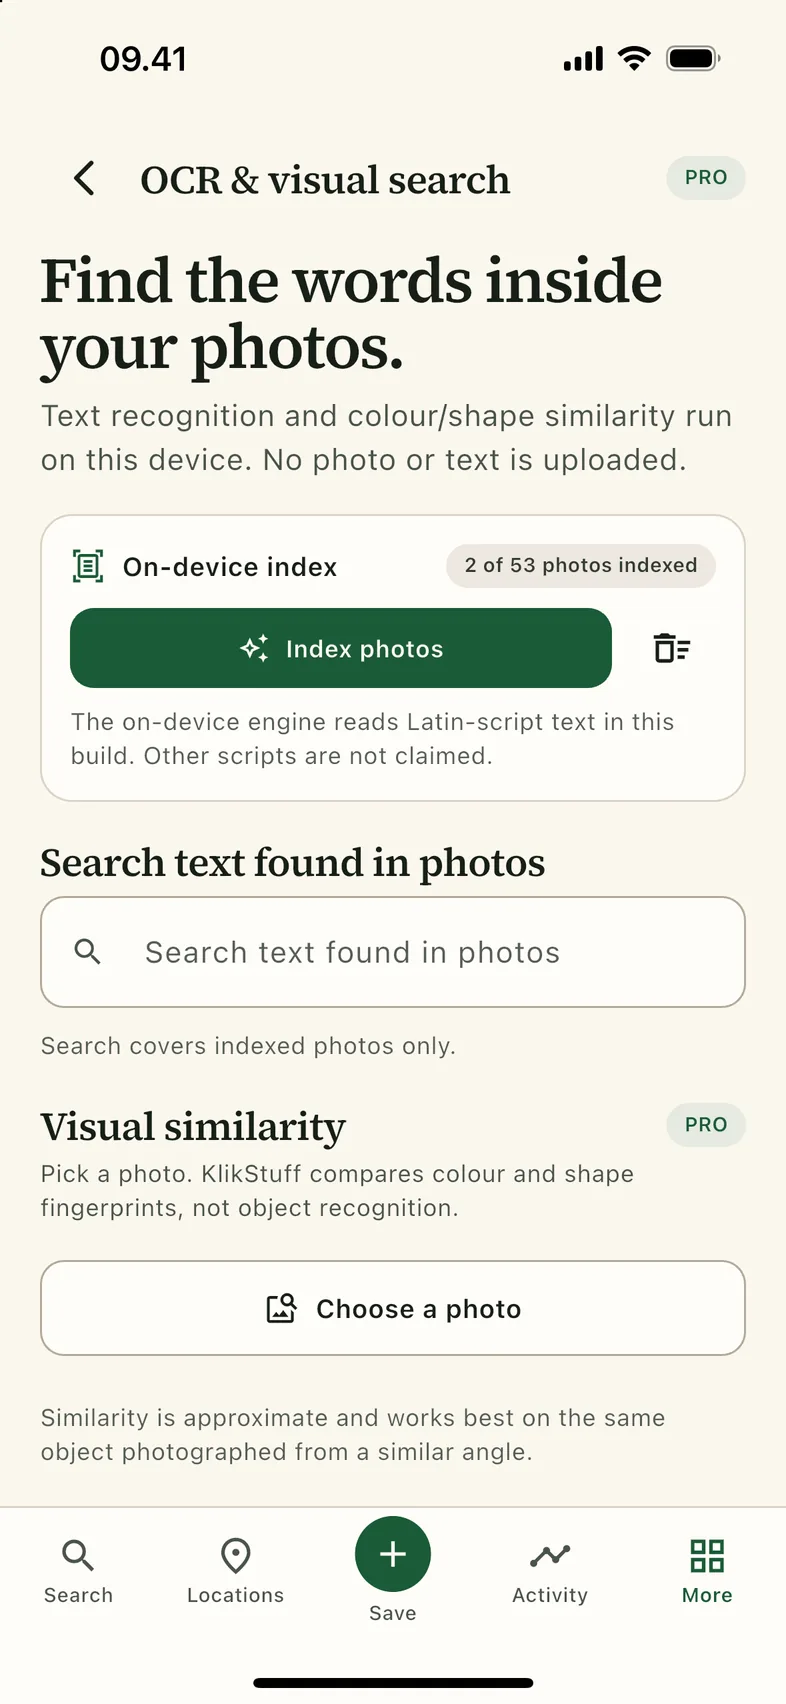
- Open More → OCR & visual search.
- Tap Index photos. Progress is shown as “2 of 53 photos indexed”.
- Type in Search text found in photos, for example a model number on a label.
- For visual similarity, tap Choose a photo and pick one from the library.
- Text recognition is on-device ML Kit, Latin script in this build. Other scripts are not claimed.
- Visual similarity compares colour and shape fingerprints. It is not object recognition.
- Recognised text and fingerprints stay local and are included in normal item search.
Tip: a clear photo of a serial plate is worth more than a dozen words. Index it once and the number becomes searchable.
Free and Pro
KlikStuff is usable for free. Pro is a single purchase, not a subscription.
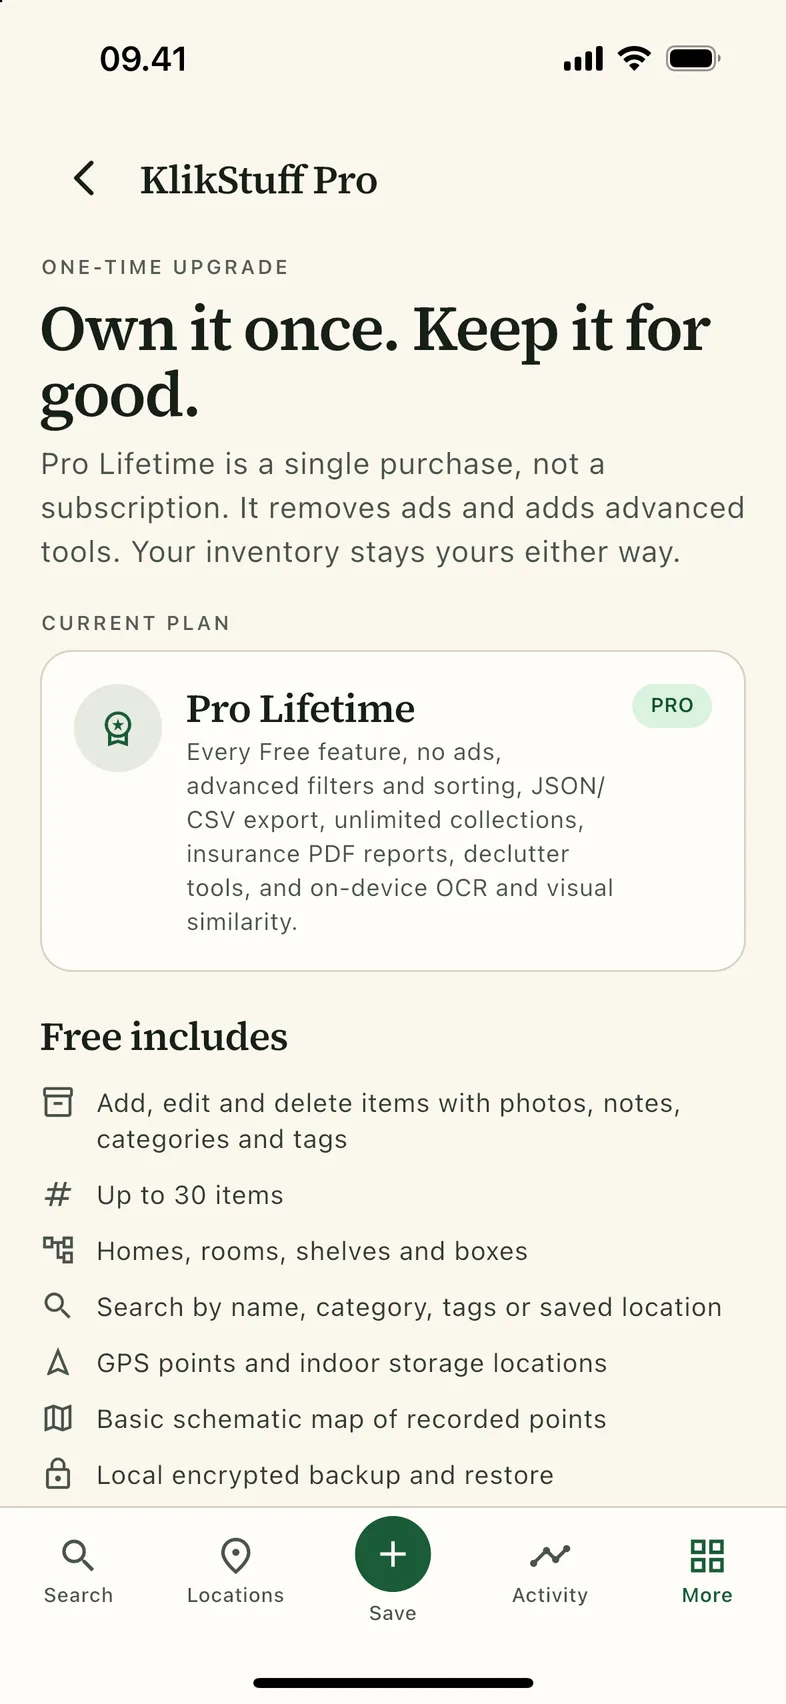
| Free | Pro Lifetime |
|---|---|
| Up to 30 items | Unlimited items |
| Ads on the home and search-results screens, plus one capped ad after a new item is saved | No ads at all |
| Up to 3 collections | Unlimited collections |
| Search, locations, labels, backup, moving, loans, consumables | Everything in Free, plus advanced filters and sorting |
| — | JSON and CSV export |
| — | Insurance PDF reports, Declutter, OCR and visual similarity |
Buy and restore live in the Pro screen. The price always comes from your app store, and a one-time purchase can be restored on a new device with the same store account.
If you already have 30 items, nothing is removed when Free limits apply. Creating new items is what gets limited.
Map & GPS
The map is a memory aid: it shows the points you chose to record. It does not track anything live.
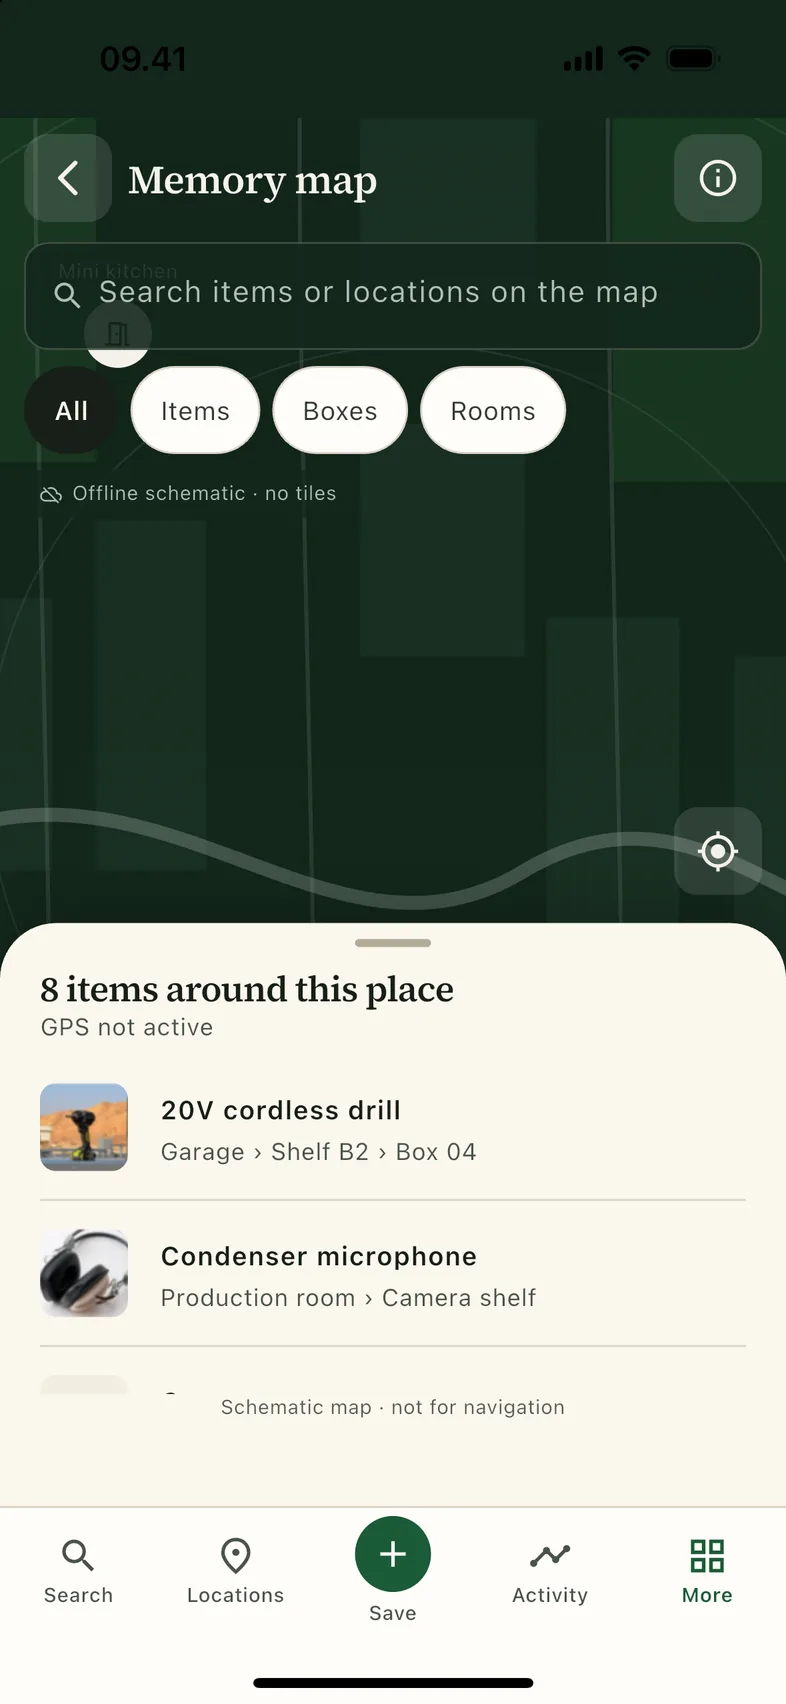
- Open More → Map & GPS, or Open map from the home screen.
- Filter by All, Items, Boxes or Rooms.
- Tap a pin to see what is around that place.
- To record a new point, open a location or item and tap Update GPS. Permission is requested only then.
- Accuracy is shown in plain language, for example
±4 m. - If location services are off or permission is denied, everything else keeps working.
- Reverse geocoding (an address for a point) is optional and needs a connection. If it fails, the coordinates are kept.
No map tiles. The background is a schematic drawing, not a street map. Indoor locations remain the source of truth; GPS is a hint for the building, not the shelf.
Language & region
Ten interface languages, one choice, stored on the device. Your content is never translated.
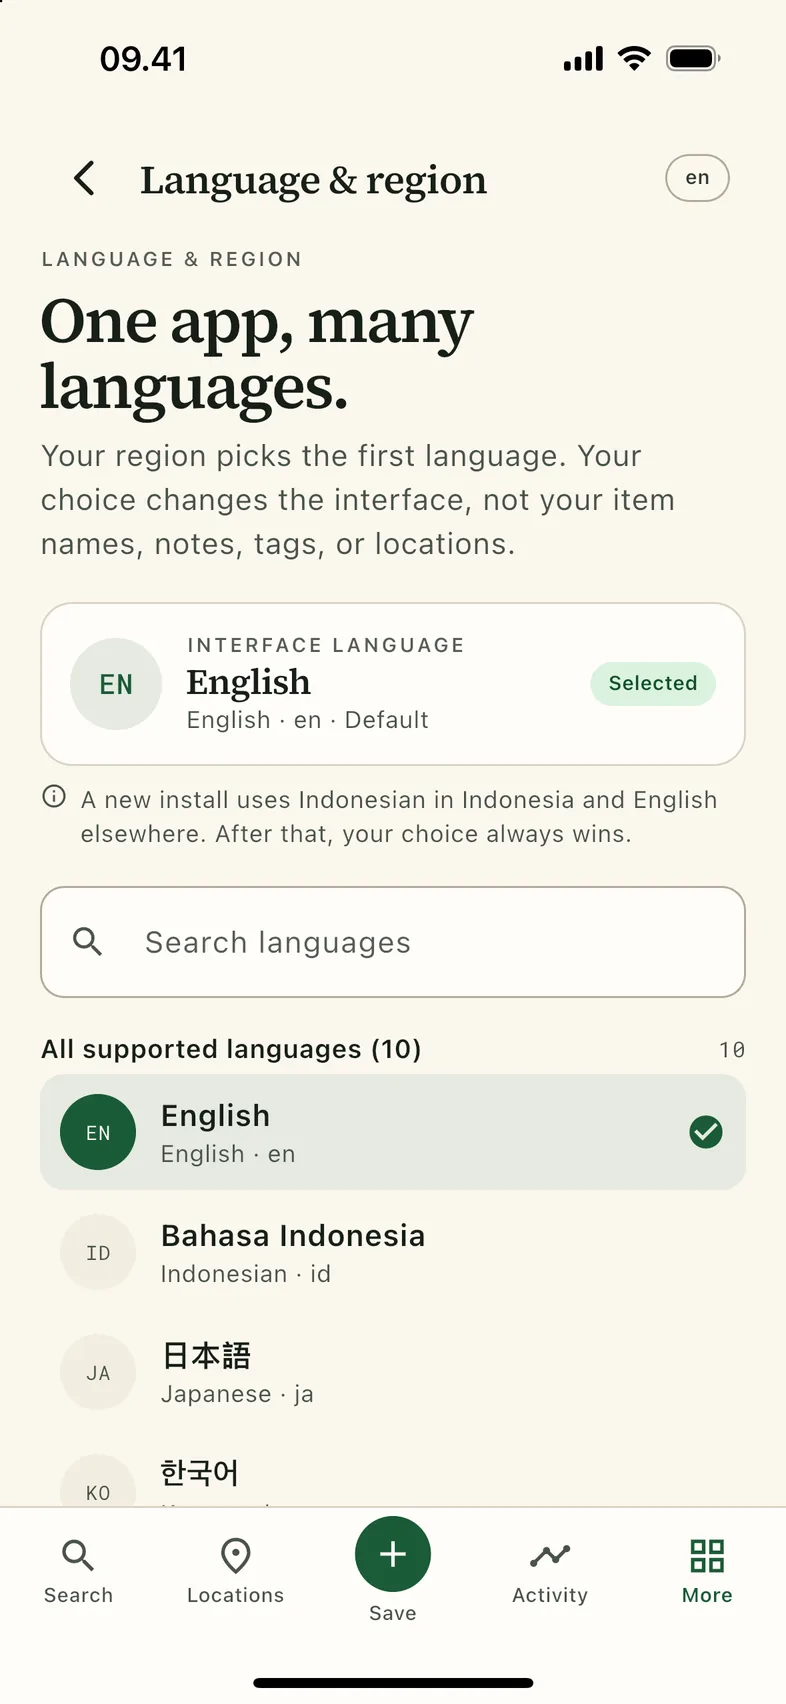
- Open More → Language & region, or Settings → Language & region.
- Search by native name, English name or code, or scroll the list.
- Tap a language. The interface changes immediately and the choice is remembered.
| Language | Code |
|---|---|
| English | en |
| Bahasa Indonesia | id |
| 日本語 | ja |
| 한국어 | ko |
| Deutsch | de |
| Français | fr |
| Español | es |
| Português (Brasil) | pt-BR |
| 简体中文 | zh-Hans |
| 繁體中文(台灣) | zh-Hant-TW |
- Dates, numbers, currency and plurals follow the selected locale.
- Item names, notes, location names and tags stay exactly as you typed them.
- Missing translations fall back to English, so the app is never half-blank.
Backup & restore
A manual, encrypted archive you keep yourself. No account, no cloud, no recovery service.
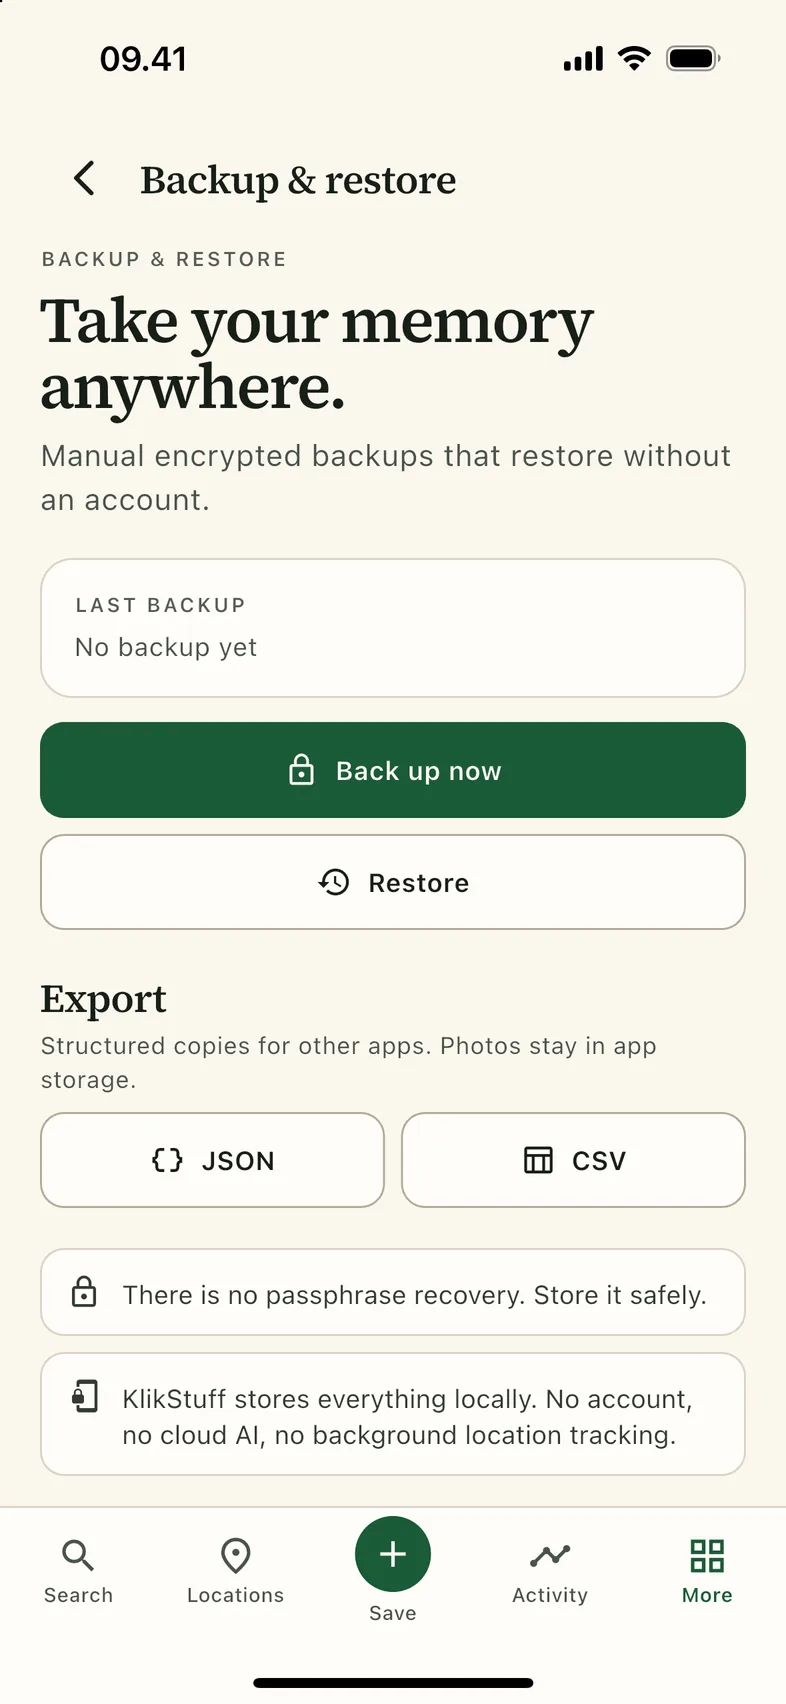
- Open More → Backup & restore.
- Tap Back up now, choose a passphrase, and save the
.klikfile somewhere you trust. - To restore, tap Restore, pick a
.klikfile and confirm the preview. - Keep the file and the passphrase separate. The app cannot recover a forgotten passphrase.
Export for other apps Pro
JSON is complete and structured; CSV opens in a spreadsheet. Photos stay in the app's storage and are not embedded in the export. On a Free plan the buttons open the Pro screen instead.
A backup is the only way to move your inventory to a new phone. Reinstalling without a backup starts from an empty inventory.
Settings
Appearance, language, data, permissions and the about section. Everything here is local.
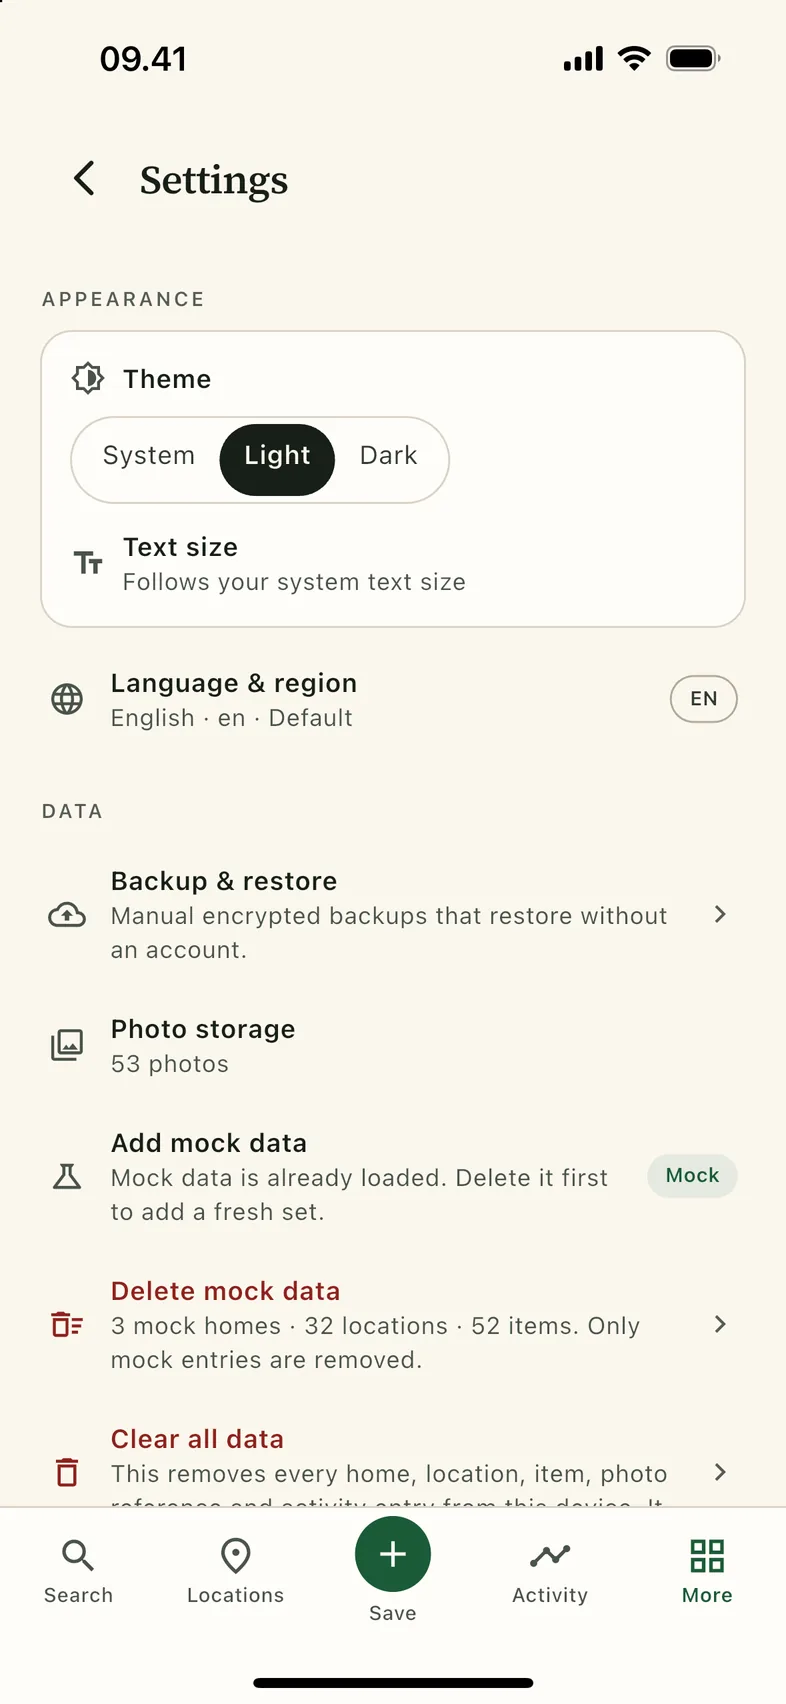
| Setting | What it does |
|---|---|
| Theme | System, Light or Dark. Saved immediately. |
| Text size | Follows your phone's system text size. |
| Language & region | Ten interface languages; sets date, number and currency formatting. |
| Backup & restore | The encrypted archive and the export screen. |
| Photo storage | How many photos are stored and how much space they take. |
| Add / Delete mock data | Loads or removes the fictional sample household only. Your own rows are never touched. |
| Clear all data | Deletes every home, location, item, photo reference and activity entry on this device. Confirmed first, and it cannot be undone. |
| GPS & permissions | Shows the location permission state and opens the system settings. |
| About | Plan, version, app permissions, this guide, and the privacy policy. |
Tip: sample data is the safe way to explore. It is marked Mock, and Delete mock data removes only those rows.
Dark mode
A real theme, not a filter. Every screen has a designed dark palette.
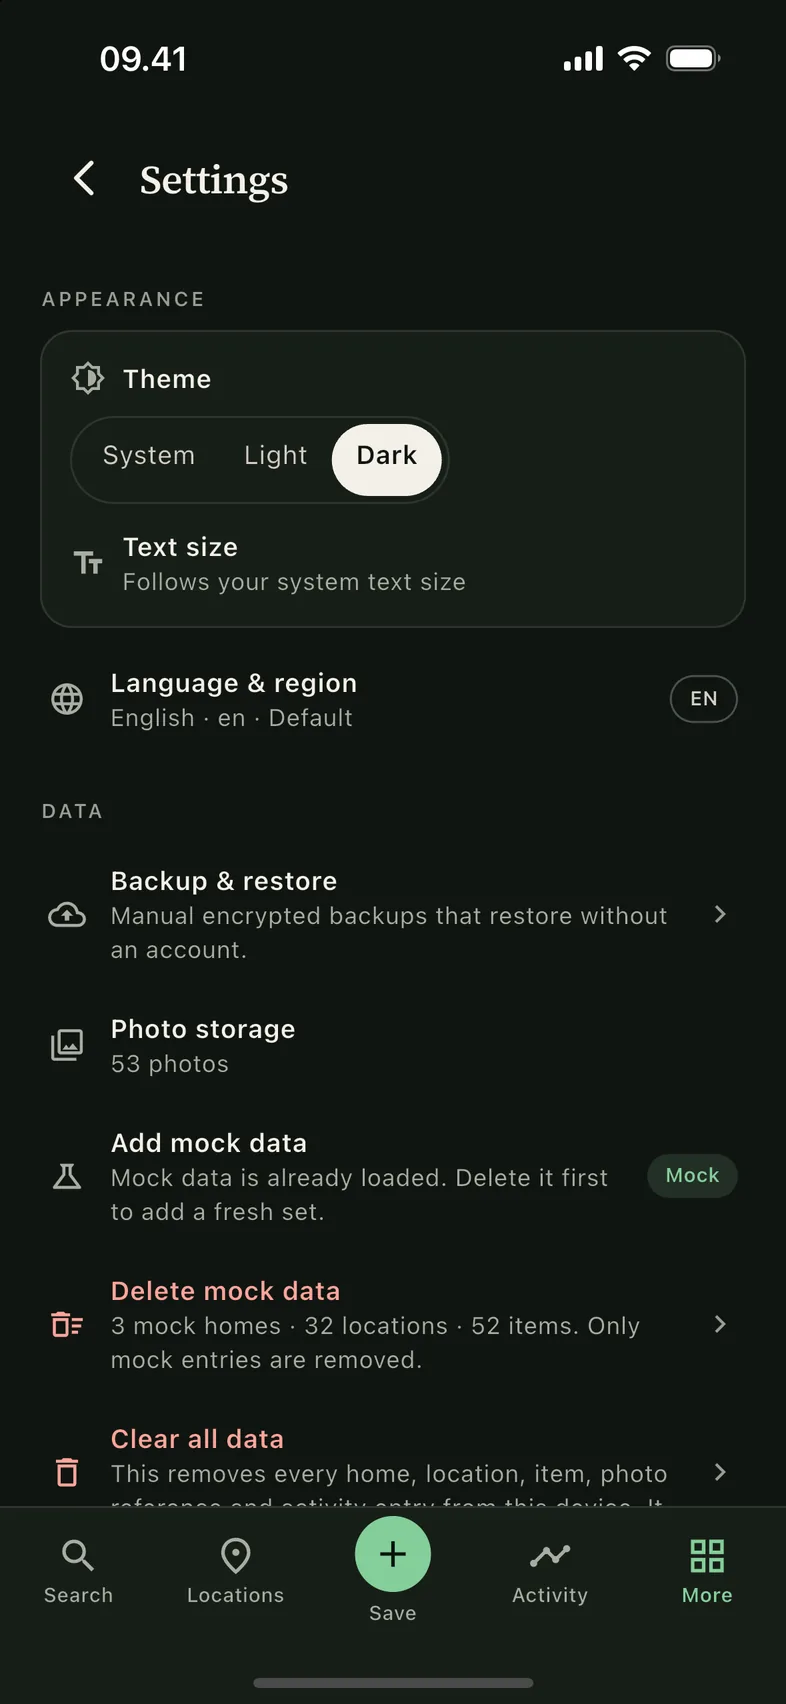
- Open Settings → Appearance → Theme.
- Choose System to follow your phone's schedule, or force Light / Dark.
- The choice is saved and applied on the next launch.
The app's own screenshots in this guide use light mode for consistency. Dark mode is documented separately so nothing is mixed.
Privacy
Local-first is a design decision, not a marketing line: there is no account and no server to send your inventory to.
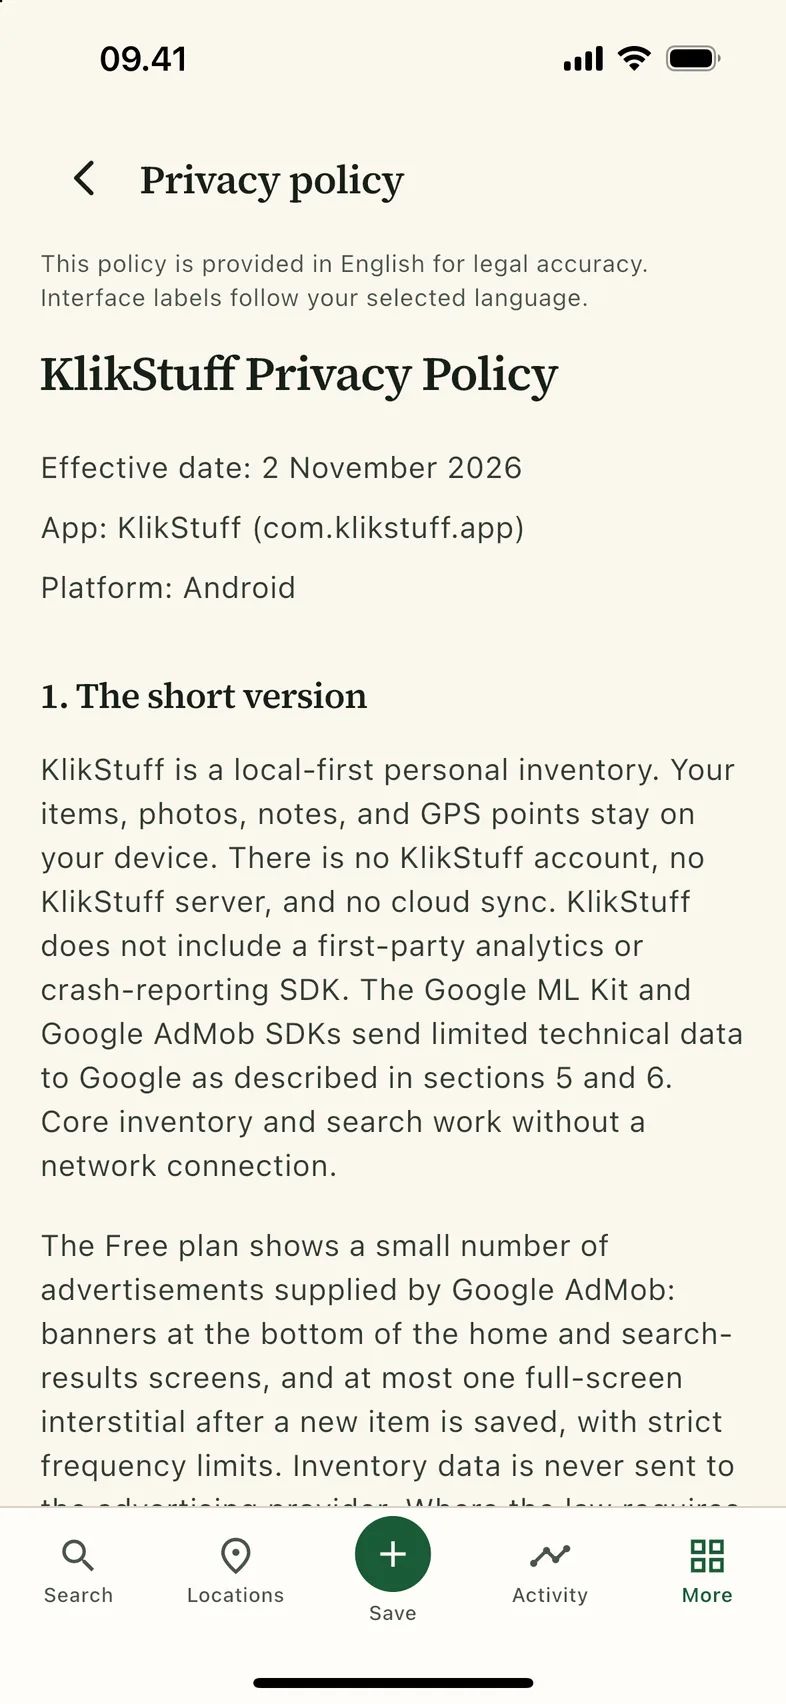
- Items, photos, collections, loans, OCR text, fingerprints and GPS points stay on the device.
- OCR and visual similarity run on the device. No photo or recognised text is uploaded.
- Camera and photo access are requested only inside capture flows. Location is requested only when you record a GPS point.
- Reverse geocoding is the only optional network call in normal use. If it fails, coordinates are kept.
- On the Free plan, ads are provided by Google AdMob with a consent flow. Pro removes all ads.
- There is no analytics, no account and no background location tracking.
Read the full policy at klikstuff-legal.pages.dev.
Questions & fixes
The things people ask most often after the first week.
Where is my data stored?
In a private database and photo folder inside the app on your phone. Nothing is uploaded. A backup is the only copy that leaves the device, and only when you create one.
Does it work without internet?
Yes. Search, locations, items, labels, moving, loans and backups all work offline. Only the optional reverse-geocoding lookup, the store purchase, and opening this web guide need a connection.
Why does an item say “Needs check”?
That is the normal state after you record a location or move an item. It means “I wrote this down, but I have not physically confirmed it since”. Open the item and tap Check to clear it.
I moved something to the wrong box. Can I undo it?
Yes. Tap Undo on the snackbar, or open Activity and undo the move there. The history keeps the old path either way.
Why can't I delete a location?
Only empty locations can be deleted. This is deliberate: KlikStuff never silently deletes the items inside a room or box. Move or delete the contents first, then delete the place.
Search finds nothing, even though the item exists.
Check three things: an active filter (open the filter icon and tap Clear), a typo shorter than three characters, or a word that only exists in a photo. Try the brand, a tag or the room name instead.
Why is the map empty?
The map only draws GPS points you recorded with Update GPS. Indoor locations do not create map pins, and the app never tracks your position in the background.
I reinstalled the app. Where did my inventory go?
Uninstalling removes app-private storage. That is why a backup matters. If you made a .klik file, install the app, open Backup & restore → Restore and use the same passphrase.
The QR code will not scan.
Use the manual code entry in the scanner and type the short code printed under the label (for example ROM-CDEGN). If the camera is blocked, the same manual option appears.
Can my family share the same inventory?
Not yet. Family and cloud sharing are a labelled roadmap item and are not faked in the app. For now, one device owns one inventory, and a backup can be moved manually.
How do I get Pro back on a new phone?
Install KlikStuff, sign in to the same app-store account, open the Pro screen and tap Restore. The purchase is tied to the store account, not to the device.
Still stuck?
Send a short description of what you did and what you expected. A screenshot of the screen helps more than a long explanation.
- Email: imoneytrackersupport@gmail.com
- Privacy policy: klikstuff-legal.pages.dev